Document e-mail pro plugin
INTRODUCTION
|
|
Licence : - Manual - Shop - Once-off license - Included in the osFinancials5 Business class subscription. |

With the Document email pro plug-in, documents can be sent by email from the TurboCASH5.2 program. The most commonly used documents are: invoices, quotes and credit notes to customers, but also order lists to your wholesaler.
It's possible to create different email templates which are appropriate to the document that is being sent. The email text to a customer with an invoice linked will be different from the text that goes to a wholesaler, in which an order list is included.
The Document email document plugin can also be used together with all kinds of other plug-ins, including: remittance, subscriptions and newsletter.
LICENSE
This plugin is shipped with the osFinanacials5 / TurboCASH5.2 (365) version. Registered versions of osFinanacials5 / TurboCASH5.2 (365) can activate this plugin for each Set of Books, in which this plugin is required.
Once the osFinanacials5 / TurboCASH5.2 subscription is purchased, an e-mail with the registration (activation) codes and instructions will be forwarded to you.
ACTIVATE THE DOCUMENT E-MAIL PRO PLUGIN IN THE SET OF BOOKS
The Document E-mail Pro needs to be activated in each set of Books, you require to use this plugin.
To activate the Document E-mail Pro plugin:
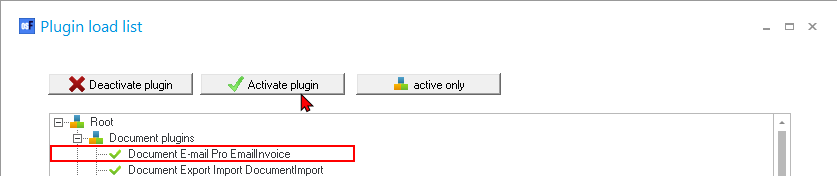
- On the Setup ribbon, select Plugins → Document plugins → Document E-mail Pro.

|
|
If the Multimedia is not listed on the Plugins menu, go to the Tools → Activate plugins (Setup ribbon) and Activate the plugin.
|

- The “Setup E-mail Pro” screen is displayed:
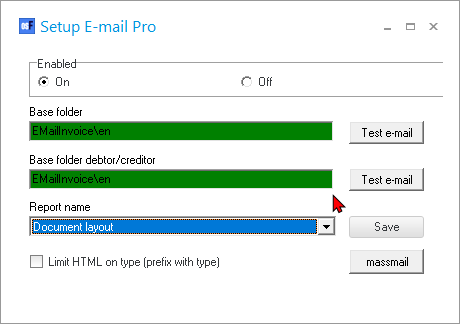
- Click the On option to enable it.
- Base folder – Enter “EmailInvoice/en”. This is the “Base folder” in which the default files are stored. It contains the test.html and test.txt files. These files are located in the “EMailInvoice/en” folder in the “...\plug_ins\reports\” directory.
- Base folder debtor/creditor - Enter “EmailInvoice/en”. This is the “Base folder debtor/creditor” in which the default files are stored. It contains the test.html and test.txt files. These files are located in the “EMailInvoice/en” folder in the “...\plug_ins\reports\” directory.
- Report name – Select a document layout file, e.g. “Document layout” file. This file changes to each document type (i.e. for sales documents (Quotes / Invoices / Credit notes) or for purchase documents (Orders / Purchases / Supplier returns)).
|
|
If the “Base folder” or the “Base folder debtor/creditor” is entered correctly, the background for these fields will be displayed in a GREEN background colour. If the Base folder or the “Base folder debtor/creditor” is not entered correctly, the background for these fields will be displayed in a RED background colour.
In this example, the “Base folder debtor/creditor” is entered as “EMailInvoice”. Since the folder does not contain valid files in the “...\plug_ins\reports” folder, it is displayed in a RED background colour. If you enter “EMailInvoice/en” as the folder, which contains the English templates, the background for these fields will change to the a GREEN background colour. |

|
|
Massmail button – This button will launch the following message: “ This feature needs a separate serial please request your trail at http://www.osf-boekhoudpakket-administratie.nl “ |
- Limit HTML on type (prefix with type) – By default this option is not selected. This will list all the available templates in the EmailInvoice/en (or /af for Afrikaans, etc.).
- If you select (tick) this option, only the “Default” option will be available.
- You may click on the Save button to store you base folders and close this screen.
|
|
To configure your e-mail settings, you may click on the Test e-mail buttons next to the “Base folder” and / or the “Base folder debtor/creditor” fields. |

TESTING AND CONFIGURATION THE E-MAIL SETTINGS
To configure your e-mail settings, you may click on the Test e-mail buttons next to
Once the valid folder names are entered for “Base folder” and the “Base folder debtor/creditor” fields, you may test and configure your e-mail settings.
To do this:
- Launch the “Setup E-mail Pro” (On the Setup ribbon, select Plugins → Document plugins → Document E-mail Pro).
- Click on the Test E-mail button (next to the “Base folder” field). The following screen is displayed:
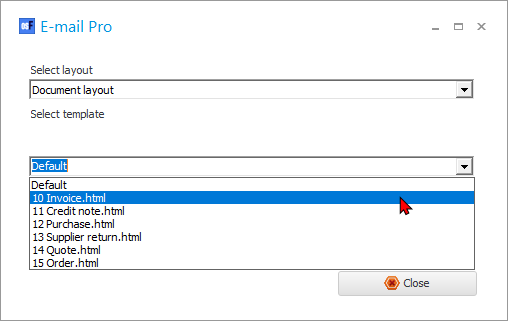
- Select the document layout file to send sales documents (i.e. quotes, invoices and credit notes) or to send purchase documents (i.e. orders, purchases or supplier returns).
- Select a template from the list, if the “Limit HTML on type (prefix with type)” option on the “Setup E-Mail Pro” screen, is not selected.
|
|
You may add your own templates or modify the existing ones according to your own requirements. |
- Click on the Close button. The “Send E-mail” screen (Free text tab) is displayed:
- Click on the Settings tab. This will allow you to setup and configure your E-mail account with your Internet Service Provider (ISP).
|
|
See the next section to configure and setup your email account. |
- Click on the Send E-mail(s) button to send the test to your own e-mail address. If your settings are correct, the Send E-mail screen will automatically close.
|
|
If it does not close, click on the Settings tab of the Send E-mail screen, and check your settings. You may then retry to send your e-mail. |
- Once you have received the e-mail (test), your settings and configuration should be completed.
- Click on the Save button of the Setup E-mail Pro screen. The basic E-mail Pro setup should be configured and ready to use.
CONFIGURING AND SETUP E-MAIL
The Send E-mail - Settings and Free Text tabs (screens) will be displayed, when:
- Launch the Setup E-mail Pro screen and you click on the Test E-mail button and thereafter on the Close button after selecting the Select Layout and Select Template fields.
- Documents – Listing screen context menu (right-click) Plugin action → E-mailPro menu.
|
|
The Send E-mail - Settings and Free Text tabs (screens) will NOT be displayed, when launched from the context menu (right-click) Plugin mass action → E-mailPro 2 menu. |
Settings tab
Once your e-mail is setup properly, you may test the e-mails, customise or add your own e-mail templates.
This screen consists of 2 different tabs; "Settings” and “Free text". In the Settings tab, a number of settings must be entered once.
To Configure and Setup E-mail Pro:
- On the “Send E-mail” screen, click the Settings tab:

- Enter or select the following, if necessary:
|
Field |
Description |
|
Path to the HTML Files: |
The default path is displayed as “D:\osFinancials5\plug_ins\reports\EMailInvoice\en\emailtemplates\”. If you have installed osFinancials5 into a different folder, you may need to overtype this. Here you specify the path where the files for the document email pro plugin are located, you can change this path to your own liking to have a personal set of files. |
|
POP username: |
Enter the POP username as registered with your ISP (Internet Service Provider) for your e-mail account settings. |
|
POP password: |
Enter the POP Password as registered with your ISP (Internet Service Provider) for your e-mail account settings. |
|
POP server: |
Enter the POP server as registered with your ISP (Internet Service Provider) for your e-mail account settings. |
|
SMTP port: |
The default port is “25”. This is determined by the default configuration of your operating system. |
|
SMTP server: |
Enter a valid SMTP as registered with your ISP (Internet Service Provider) for your e-mail account settings. Note with POP before SMTP (usually if you do not send e-mails via your provider) it is best to create an e-mail box that no one else will read. This is because if mail is read with multiple Internet Service Providers (IPS) on the mailbox, the POP for SMTP will not work properly. It is best to use an account that is not used by anyone else. |
|
SMTP username: |
Enter the SMTP username as registered with your ISP (Internet Service Provider) for your e-mail account settings. |
|
SMTP password: |
Enter the SMTP password as registered with your ISP (Internet Service Provider) for your e-mail account settings. |
|
Return e-mail: |
Here you can enter your own email address to which the recipient can mail back, if desired. |
|
Return name: |
Here you can enter your own name that will allow the recipient to see who you are. |
|
CC: (multiple separate with ;) |
This abbreviation CC “Carbon Copy” indicates secondary recipients of a message. Those recipients who are to receive a copy of a message directed to another. The list of recipients in the CC field is visible to all other recipients of the message. Enter a valid e-mail address, if necessary. |
|
BCC: (multiple separate with ;) |
This abbreviation BCC “Blind Carbon Copy” allows you to send a copy of your correspondence to a third party when you do not want to let the recipient know that you are doing this (or when you do not want the recipient to know the third party's e-mail address). You may also wish to enter this filed, when sending an e-mail to multiple recipients, you can hide their e-mail addresses from each other. Enter a valid e-mail address, if necessary. |
|
Send max mail: |
The default is “100”. You may use the scroll buttons or enter the number of the maximum emails required to send in a batch. This will limit the number of email messages. |
|
Timer threshold in sec: |
The default is “10” seconds. This is determined by the default configuration of your operating system. It is not recommend ed to change this, but you could experiment by changing the values. |
|
Default: |
Select “Default” or “HTML only”. |
|
alt methode: |
|
|
Send receipt notification: |
Tick if you need a confirmation notification when the email has arrived (no read confirmation!). |
|
SASL and TLS: |
Simple Authentication and Security Layer (SASL) and Transport Layer Security (TLS) https://en.wikipedia.org/wiki/Simple_Authentication_and_Security_Layer. SASL typically also support Transport Layer Security (TLS) to complement the services offered by SASL. |
|
Priority: |
The default option is “Normal”. You may increase the priority to “High” and “Highest”. You may decrease the priority to “Low” and “Belowlow” |
|
SSL/TSL version: |
Select the version for the Simple Authentication and Security Layer (SASL) Transport Layer Security (TLS) from the list. |
|
Sign any PDF: |
Optional. You can sign any pdf with this button (also the ones send to you). This will allows you to select a pdf file. |
|
Find certificate: |
If you have a certificate, click in this button. You can browse for your security certificate so that it will be used for the security of the sent PDF files. You may use add Digital signatures to the PDF (portable document format) files (e.g. OpenSSL pkcs12.pxf) to your e-mail received by your recipients (e.g. debtors (customers) or creditors (suppliers)). Find certificate: With this button See: |
|
Certificate password: |
If you have selected a certificate, you need to enter a valid password for that certificate. |
|
UBL: |
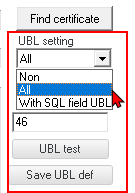
From osFinancials version 4.0.0.1102 and TurboCASH5.2 (365) it is possible to send UBL2.0 files with the document. The option can be enabled on the settings tab and has 3 settings • None (default) This option will not send UBL • Always send a UBL • Based on a UBL field in the dataset that contains the value T. The output can be checked for validity via this website https://peppol.helger.com/public/locale-en_US/menuitem-validation-bis2 By default, EUR is used for currency exports. For item unit standard SK is used or the first 2 letters of the item unit. |
|
UBL test: |
|
|
Save UBL def: |
|
|
Show current sql: |
This button displays the current SQL in the memo used for the query. The sql which will be displayed, is the email.txt in the sql folder. |
|
Reload: |
This button will reload the sql from the memo (to test what an adjustment would do). |
|
Generate text from HTML: |
|
- Once the E-mail Pro is properly configured and set, you may click on the Send test mails button.
|
|
Some messages, e.g. may be displayed in the text area (on the lower right-hand side) of the “Settings” screen. An example may be “your e-mail address Login failed”. This may indicate that something is not correctly entered on the settings. |
|
|
If the email has been sent successfully, the message should display as follows: Sending email using SMTP... IdSMTP1-ST2-Connected. IdSMTP1-ST5-Encoding text IdSMTP1-ST5-Encoding text IdSMTP1-ST5-Encoding attachment IdSMTP1-ST5-Encoding attachment IdSMTP1-ST3-Disconnecting. IdSMTP1-ST4-Disconnected. Sending email test Done please check you email adres... |
Setup Wizard
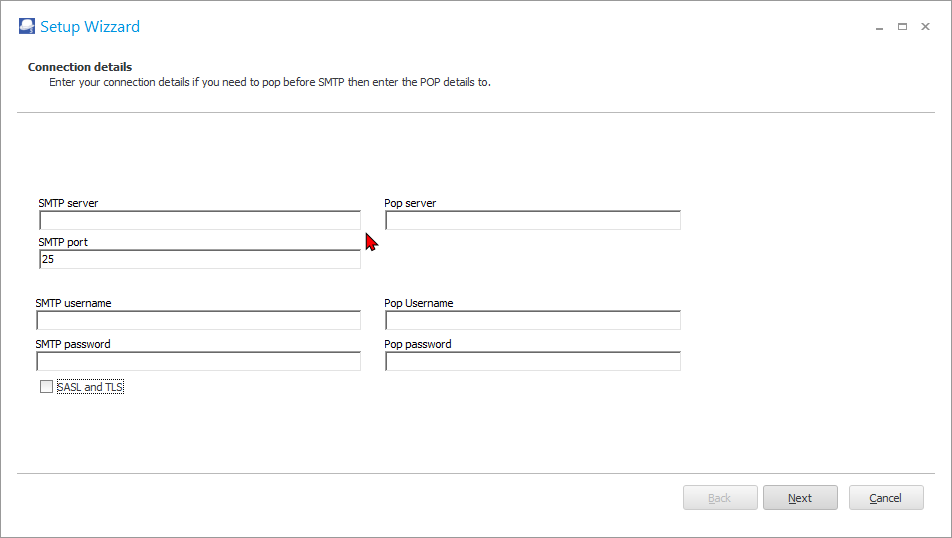
In addition to the Settings tab, you may also launch the “Setup Wizzard” to configure your connection details, for your SMTP and POP servers:
The options, is as follows:
|
Field |
Description |
|
SMTP server: |
Enter a valid SMTP (outgoing mail server) as registered with your ISP (Internet Service Provider) for your e-mail account settings. Note - with POP before SMTP (usually if you do not send e-mails via your provider) it is best to create an e-mail box that no one else will read. This is because if mail is read with multiple IPS on the mail box, the pop for SMTP will not work properly. It is best to use an account that is not used by anyone else. |
|
SMTP Port: |
The default port is “25”. This is determined by the default configuration of your operating system. |
|
SMTP username: |
Enter the SMTP username as registered with your ISP (Internet Service Provider) for your e-mail account settings. |
|
SMTP password: |
Enter the SMTP password as registered with your ISP (Internet Service Provider) for your e-mail account settings. |
|
POP server: |
Enter the POP server as registered with your ISP (Internet Service Provider) for your e-mail account settings. |
|
POP Username: |
Enter the POP username as registered with your ISP (Internet Service Provider) for your e-mail account settings. |
|
POP password: |
Enter the POP password as registered with your ISP (Internet Service Provider) for your e-mail account settings. |
Click Next.
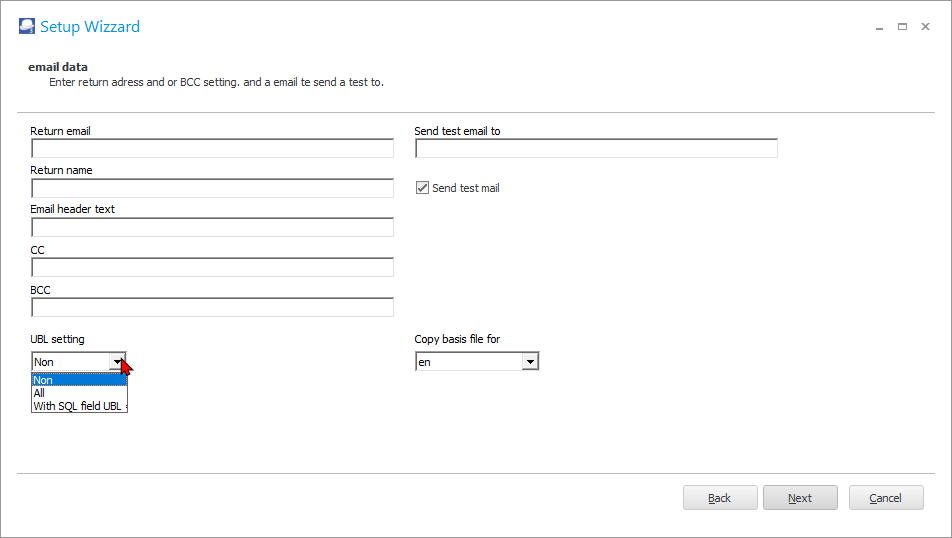
The options, is as follows:
|
Field |
Description |
|
Return e-mail: |
This field is optional. You may enter your own e-mail address. |
|
Return name: |
Enter your name. |
|
E-mail header text: |
Add the text you need to send as the e-mail subject. |
|
CC: (multiple separate with ;) |
This abbreviation CC “Carbon Copy” indicates secondary recipients of a message. Those recipients who are to receive a copy of a message directed to another. The list of recipients in the CC field is visible to all other recipients of the message. Enter a valid e-mail address, if necessary. |
|
BCC: (multiple separate with ;) |
This abbreviation BCC “Blind Carbon Copy” allows you to send a copy of your correspondence to a third party when you do not want to let the recipient know that you are doing this (or when you do not want the recipient to know the third party's e-mail address). You may also wish to enter this filed, when sending an e-mail to multiple recipients, you can hide their e-mail addresses from each other. Enter a valid e-mail address, if necessary. |
|
Send test mail to: |
Here you can enter your own email address for the test. |
|
Send test mail to: |
Thick this option if a valid e-mail address is entered in the “Send test mail to” field. |
|
Copy basis file for: |
The default setting is “nl for the Dutch language. Select “en” for English. |
|
Certificate password: |
If you have selected a certificate, you need to enter a valid password for that certificate. |
|
UBL: |
From osFinancials version 4.0.0.1102 and TurboCASH5.2 (365) it is possible to send UBL2.0 files with the document. The option can be enabled on the settings tab and has 3 settings • Do not send UBL (standard) • Always send a UBL • Based on a UBL field in the dataset that contains the value T. The output can be checked for validity via this website https://peppol.helger.com/public/locale-en_US/menuitem-validation-bis2 By default, EUR is used for currency exports. For stock unit standard SK is used or the first 2 letters of the stock unit. |
Click Next to check your settings.
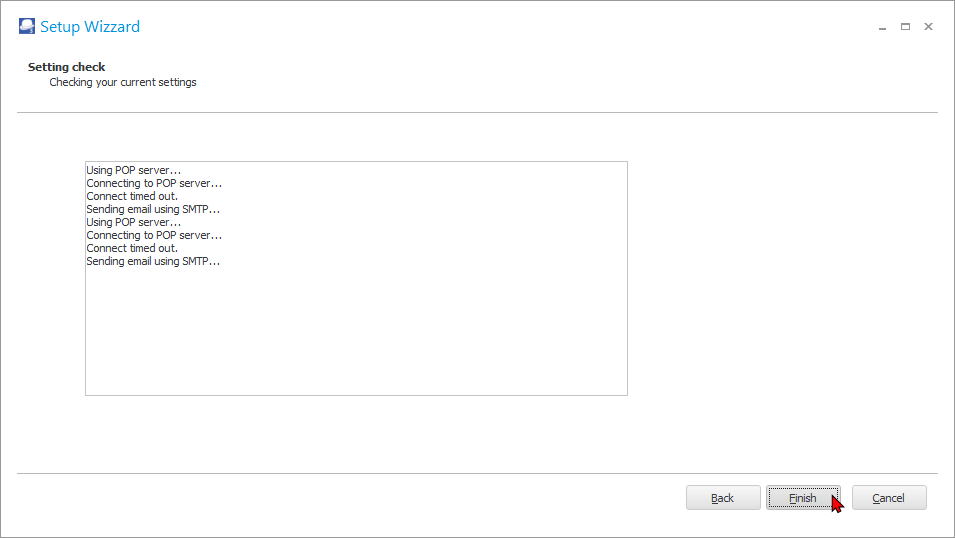
If there are any errors, you need to click Back and correct your settings and configuration.
SENDING TEST E-MAILS
Preview the Test mail message
The test mails sent from the Send test mails button on the Settings tab – confirms that the mail is properly configured and you can proceed to mail your debtors (customers) and / or creditors (suppliers).
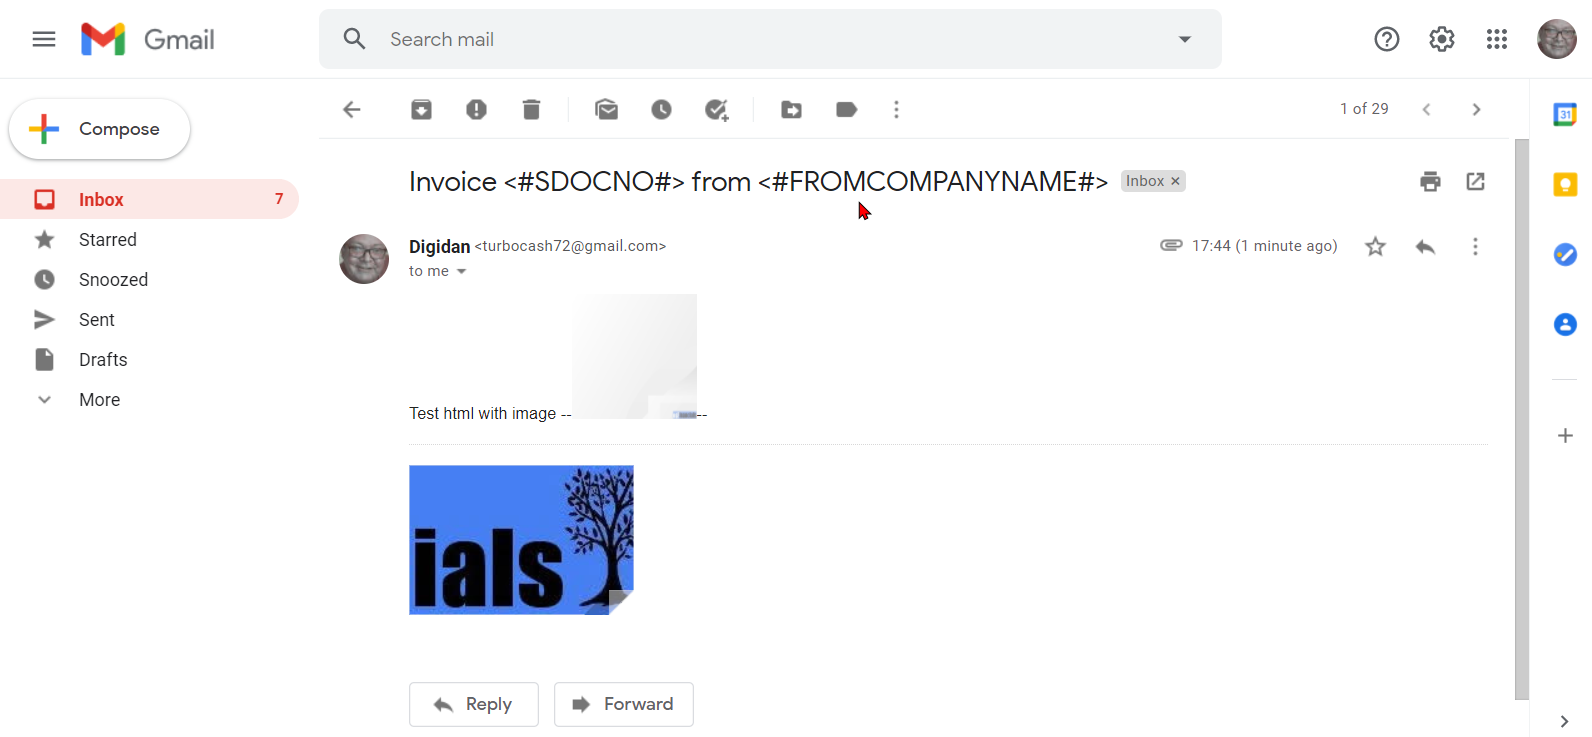
The Subject of the email message is the *.ini file for the document type. Email header text= “Invoice < #SDOCNO# > from < #FROMCOMPANYNAME# > ” for the test mail purposes only. The correct document number and your company’s name will only be displayed when sending documents via e-mail.
Two images will be attached:
- Background1.Jpg located in the .../ bin / themes / (selected theme) folder.
- logo.jpg – Located in the root directory of your osFinancials5 installation.
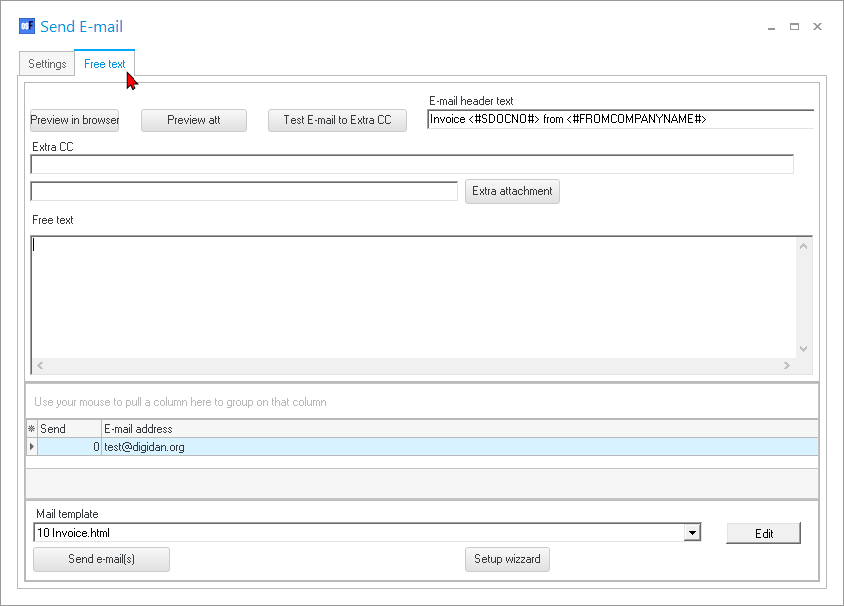
Free text tab (Testing – Sending E-mail)
Once everything has been entered correctly, a (test) e-mail can be sent. To do this, go to the tab "Free text". The e-mail is actually sent from here.
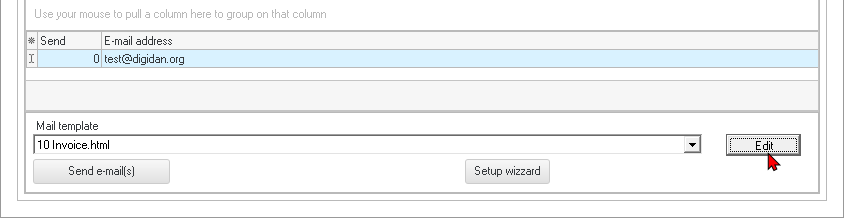
As explained earlier in the manual, a corresponding message is sent in addition to the document. There are a number of sample messages that can be used. These messages are set in the selected in “Mail template”.
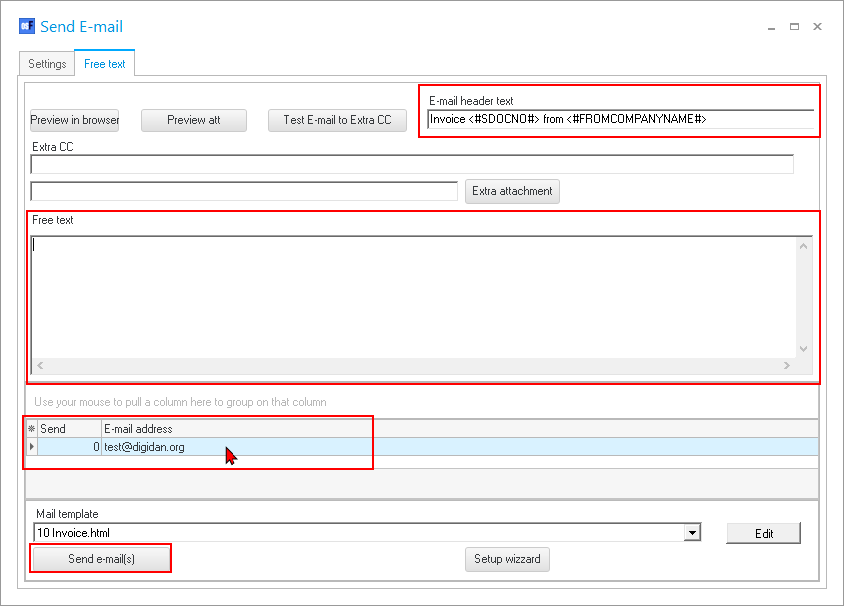
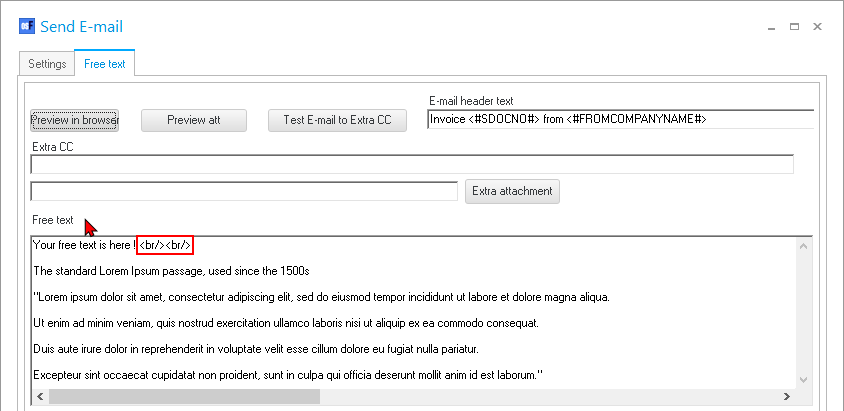
E-mail header text – The content of the *.ini file for the selected template is displayed.
Free text – In addition to the standard messages included in the selected template, you may enter any additional text in the Free text area to be included in the email message in.
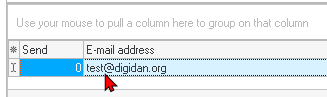
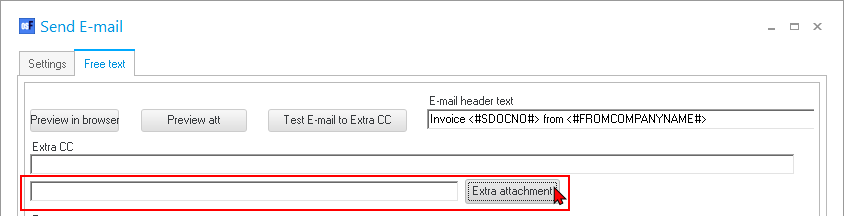
E-mail address – To send a test e-mail, enter a test e-mail address (own e-mail address) in the heading "E-mail address" (see red mouse cursor).
Now the test e-mail can be sent by clicking the Send e-mail(s) button.
The options, is as follows:
|
Field |
Description |
|
Show in browser: |
This button will allow you to preview the message of the email in your web browser. |
|
Preview att: |
This button will allow you to preview the file (e.g. invoice.pdf) which will be sent with the email. |
|
Test E-mail to Extra CC: |
This button will allow you to test the email to be sent with file by sending it to the specified email address (your own email address) |
|
Extra CC: |
Here you enter your own email address to send the email to yourself as a test, or as an extra recipient of the email to be sent. |
|
Extra attachment: |
This button will allow you to add an extra file from your system to be attached to the mail. |
|
E-mail header: |
Here you enter text for the subject (header) of your mail. |
|
Free text: |
Here you can enter additional text (in html), which are not in the template text, for example, this can be an extra text for this recipient only. This free text will be included in the message section of the mail message. |
|
Mail template: |
A list of the available templates. Select another template for the message, if required. |
|
Edit: |
This button allows you to open the folder containing the selected template. You may then edit it, if necessary. |
|
Send e-mail(s): |
This button will send the email. |
Colored area: This contains information about the recipient and is as follows:
- Send: At 0, the email has not yet been sent. The email has been sent at 1. If -1 is displayed, there is an error with sending mail. You need to go back to the “Settings” tab or the “Setup wizzard” to reconfigure your mail settings.
- E-mail address: The e-mail address of the recipient, which can be adjusted on the spot for the e-mail that is being sent at that time.
- No.: The Account id, for the debtor or creditor account.
SENDING E-MAIL(S)
Once your Document e-mail Pro is correctly configured, you may send e-mail or e-mails from documents.
Sending E-mails from Document entry
To send e-mail for documents:
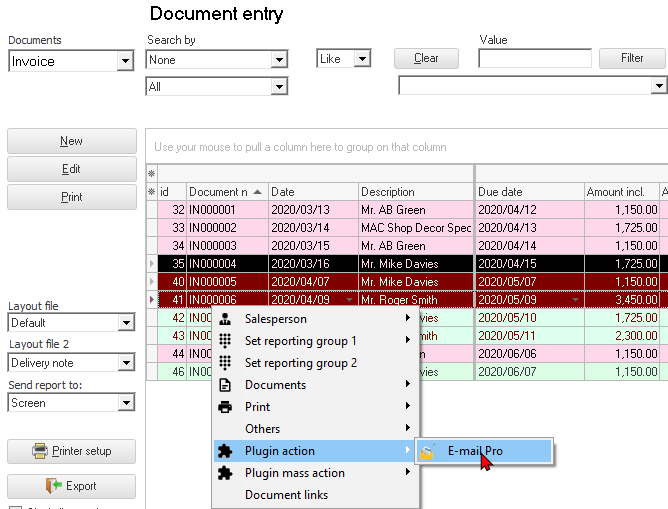
- On the Default ribbon, select Documents. The Document entry screen, listing your Invoices, will be displayed.
- Select a document or documents, and right-click on it. On the context menu, select “Plugin action → E-mail Pro”.
- The “E-mail Pro” screen, will open again.
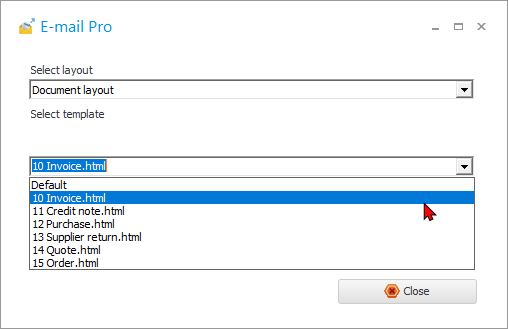
- Choose the correct Layout file (i.e. Document layout or quote / invoice / credit note / order / purchase / supplier return, etc.) and the correct template (the message you want to include).
- Then click Close.
- The email screen will open.
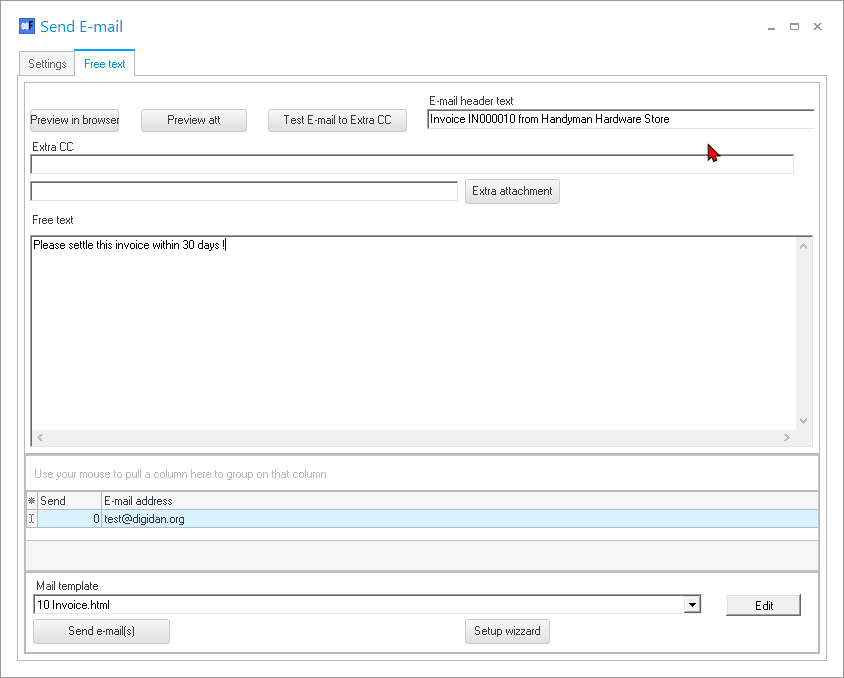
- E-mail header text – The content of the *.ini file for the selected template is displayed.
- Free text – In addition to the standard messages included in the selected template, you may enter any additional text in the Free text area to be included in the email message in.
- E-mail address – This e-mail address is the e-mail address as entered on your debtor / creditor account and included or entered in the document entry screen, will be displayed here.
- You may enter some additional text in the “Free text” field you wish to be included in the e-mail message.
- Then click on Send e-mail(s) to send the email. The selected invoice(s) will be sent as an attachment to the recipient(s).
- The “Document E-mail Pro” screen will automatically be closed.
Once again, the options, is as follows:
|
Field |
Description |
|
Show in browser: |
This button will allow you to preview the message of the email in your web browser. |
|
Preview att: |
This button will allow you to preview the file (e.g. invoice.pdf) which will be sent with the email. |
|
Test E-mail to Extra CC: |
This button will allow you to test the email to be sent with file by sending it to the specified email address (your own email address) |
|
Extra CC: |
Here you enter your own email address to send the email to yourself, or as an extra recipient of the email to be sent. |
|
Extra attachment: |
This button will allow you to add an extra file from your system to be attached to the e-mail. |
|
E-mail header: |
Here you enter text for the subject (header) of your mail. |
|
Free text: |
Here you can enter additional text (in html), which are not in the template text, for example, this can be an extra text for this recipient only. This free text will be included in the message section of the mail message. |
|
Mail template: |
A list of the available templates. Select another template for the message, if required. |
|
Edit: |
This button allows you to open the folder containing the selected template. You may then edit it, if necessary. |
|
Send e-mail(s): |
This button will send the email. |
Colored area: This contains information about the recipient and is as follows:
Send: At 0, the email has not yet been sent. The email has been sent at 1. If -1 is displayed, there is an error with sending mail. You need to go back to the “Settings” tab or the “Setup wizzard” to reconfigure your mail settings.
E-mail address: The e-mail address of the recipient, which can be adjusted on the spot for the e-mail that is being sent at that time.
No.: The Account id, for the debtor or creditor account.
Sending mass e-mails
To send mass e-mails for documents:
- On the Default ribbon, select Documents. The Document entry screen, listing your Invoices, will be displayed.
- Select the documents, and right-click on it. On the context menu, select “Plugin mass action → E-mail Pro”.
- A confirmation message “Do you wish to continue?” will be displayed.
- Click Yes to continue.
Sending E-mails from E-Mail Pro tab - Debtor / Creditor accounts
VIEW MAIL MESSAGES
Document attachment
The selected documents will automatically be attached as a Portable Document Format (*.pdf) file.
UBL attachment
If the UBL setting is selected, the xml file will be generated and sent to the recipient as an attachment to the e-mail message.
|
Setup wizard (second screen) |
Settings tab |
|
|
|
|
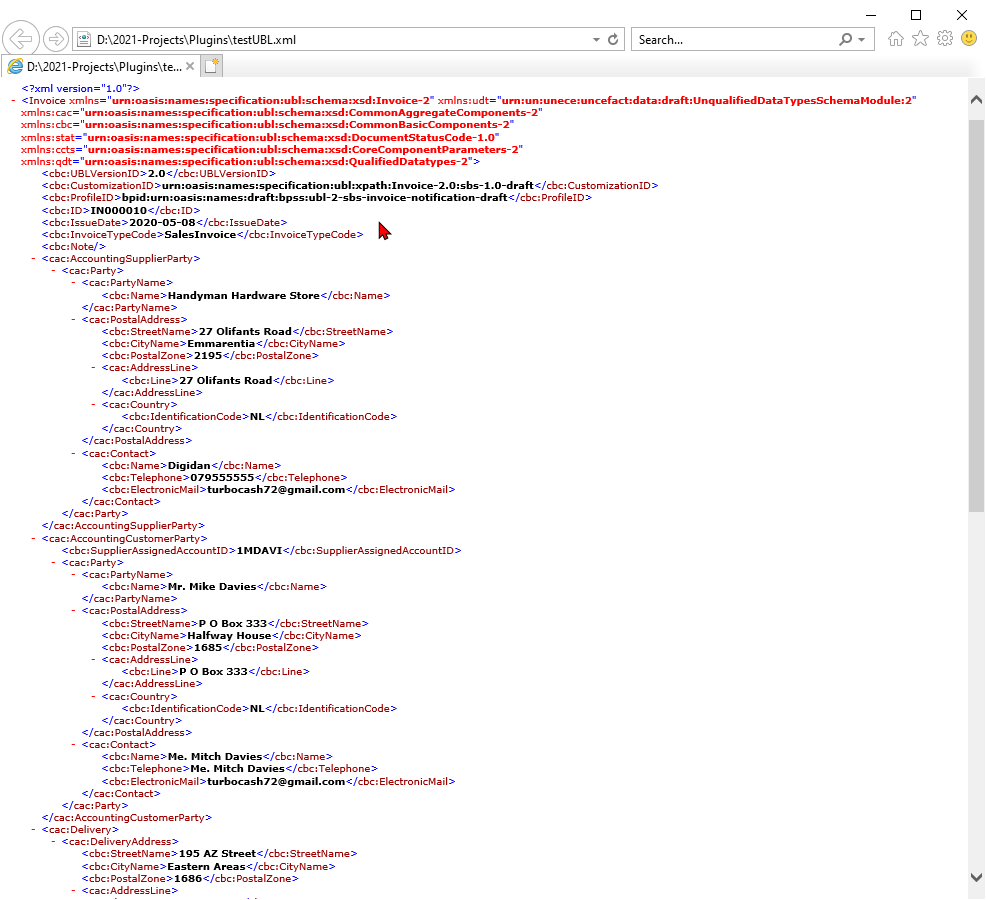
UBL test button – Save a testUBL.xml file to a selected folder on your system. Save UBL def button – Save the UBL definition. |

An example of the UBL2 file:

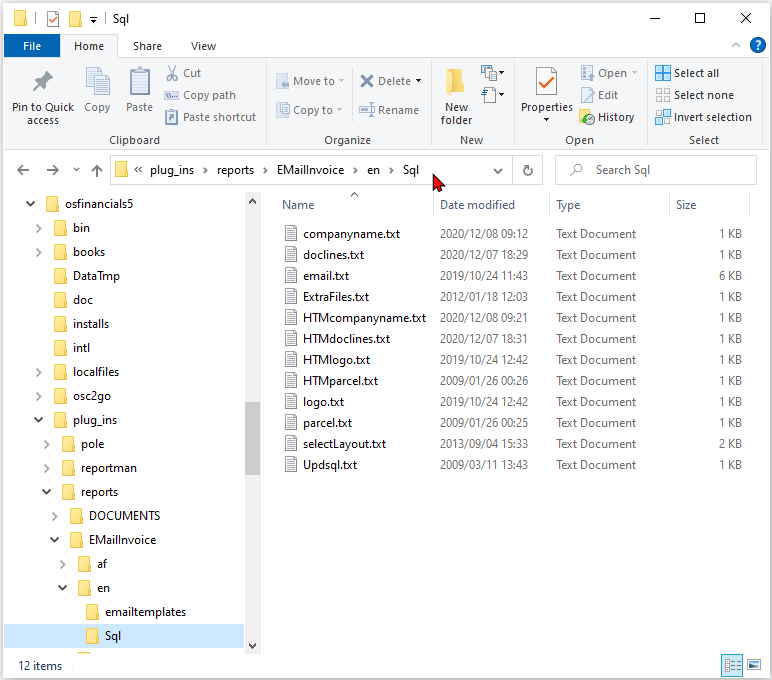
E-MAIL PRO FOLDERS IN THE SET OF BOOKS DIRECTORY
Email folder
files folder
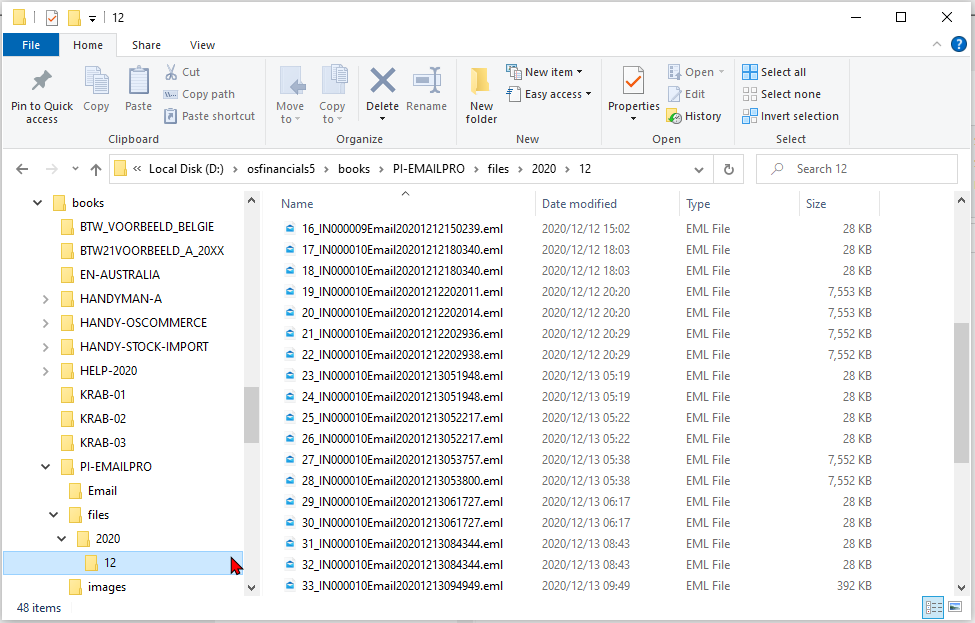
All email messages are stored in the files folder for the Set of Books. The emails are stored in sub folders for each period e.g. YYYY/MM.
In this example, these emails were sent in December 2020 (2020/12), etc.
Email message File names
The file name of the email messages is stored as follows:
- 1_ incremented number for each email sent
- Document number – The document number for which the email is sent.
- Email timestamp YYYY/MM/DD followed by Hour minute and second on which the email was sent.
- File extension (file type) *.eml
Searching for email messages in the File explorer
In the search box in your system’s file explorer, enter a name, contact any part of an address, postal code, contact, any text entered on the < #FREETEXT# > section of your message, etc. and hover your mouse over the list.
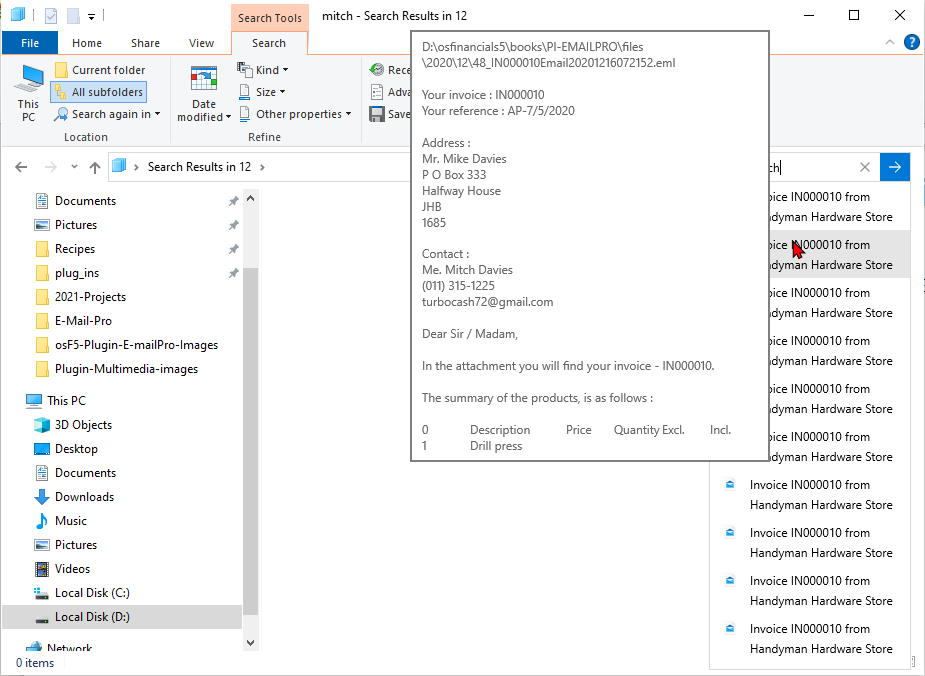
The details of your template used to sent the message will be displayed.
Once you have found what you are looking for, double-click and the message will be opened in your system’s default e-mail program.
You may also right-click on a selected e-mail message and select the available options to open the mail message with.
TEMPLATES
The templates in TurboCASH5.2 (build 374) consists for the following language folders:
- nl – Netherlands (only in osFinancials)
- en – English
- en-us – English – United States of America
- af – Afrikaans
Templates for each language, are structured in two (2) folders:
- emailtemplates – Contains three (3) templates for each document type (i.e. sales documents (quotes, invoices, and credit notes) and purchase documents (orders, purchases and supplier returns)). The template files for each document type consists of the following files:
- *.ini file – This contains the content for the “E-mail header text” which will display as the Subject in the e-mail message of the recipient. In addition to this, it can also contains specific settings to override the configuration and
- *.txt file – This is the plain text version of the messages in the body of the e-mail message.
- *.html file – This should have the exact same content as the plain text version of the messages in the body of the email message, but with the hypertext markup language (html) commands and tags to render properly in webpages or html format output.
|
|
Besides the .html version of the e-mail template, you also need a "plain text" variant. The reason for this, is that the e-mail program that the recipient of your email uses, can choose which of the 2 emails is actually used. This is dependent on the e-mail configuration and settings. In addition, the recipient may also have chosen to have his program work with only 1 variant. One program can "handle" both variants, other programs only one. The difference between the "plain text" and the "html" variant is the use of the html commands and tags. These should all be removed for the "plain text" variant. |
- Sql – The sql folder contains various corresponding sql files to load and render your selection and processes from the Set of Books (database) to the Document E-mail Pro plugin in the *.txt and *.html files.
|
|
For the purpose of this documentation, the English templates will be discussed. |
Template names and storage
(" ... \ plug_ins \ reports \ EMailInvoice \ en \ emailtemplates \ " folder)
To open the template folder:
On the "Free text" tab, click the "Edit" button.
The folder for the files entered in the Setup E-Mail Pro screen (Plugins → Email Pro on the Setup ribbon) will be opened.
Three (3) files for each document type is included in the folder for each document type:
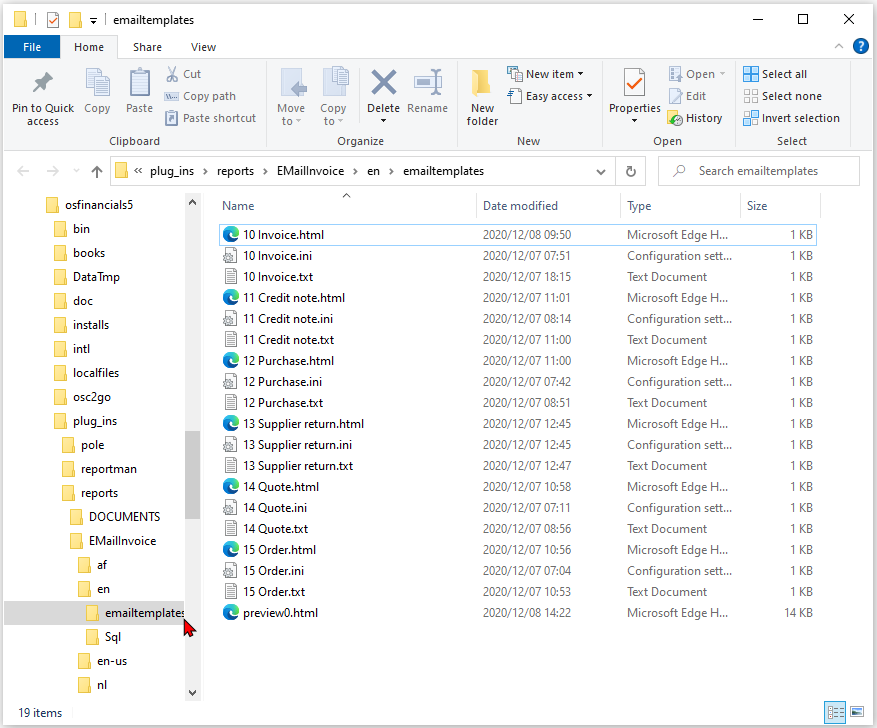
It is a good idea to always create 3 files for each template:
- INI - template name.ini – This will fill the recipients e-mail Subject with the document number and company name (e.g. “Invoice <#SDOCNO#> from <#FROMCOMPANYNAME#>” In the .ini file you can enter the settings that have priority over the settings in the plugin itself.
- HTML - template name.html – In the html version you can put the html texts for your template.
- TXT - template name.txt – In the txt version you can put the plain text (no html tags).
|
|
The “preview0.html file is not included in the install. It will be automatically added if you click on the Preview in browser button. |
After launching, the “Document E-mail pro”, the following screen is displayed:
Select layout - Select a layout file.
Select template – select one of the template files stored in the folder. These template file names are prefixed with the document type id in the database.
Adding Free text
All templates consists of a < #Freetext# > field tag.
The text is optional and you may add additional text to the selected template. This free text will be added to the message section of the recipient’s e-mail message.
|
|
To add a line break enter the html tag <br/> next to the sentence entered. If you need an extra space enter the <br/><br/> tag twice (2X) for a blank line. |
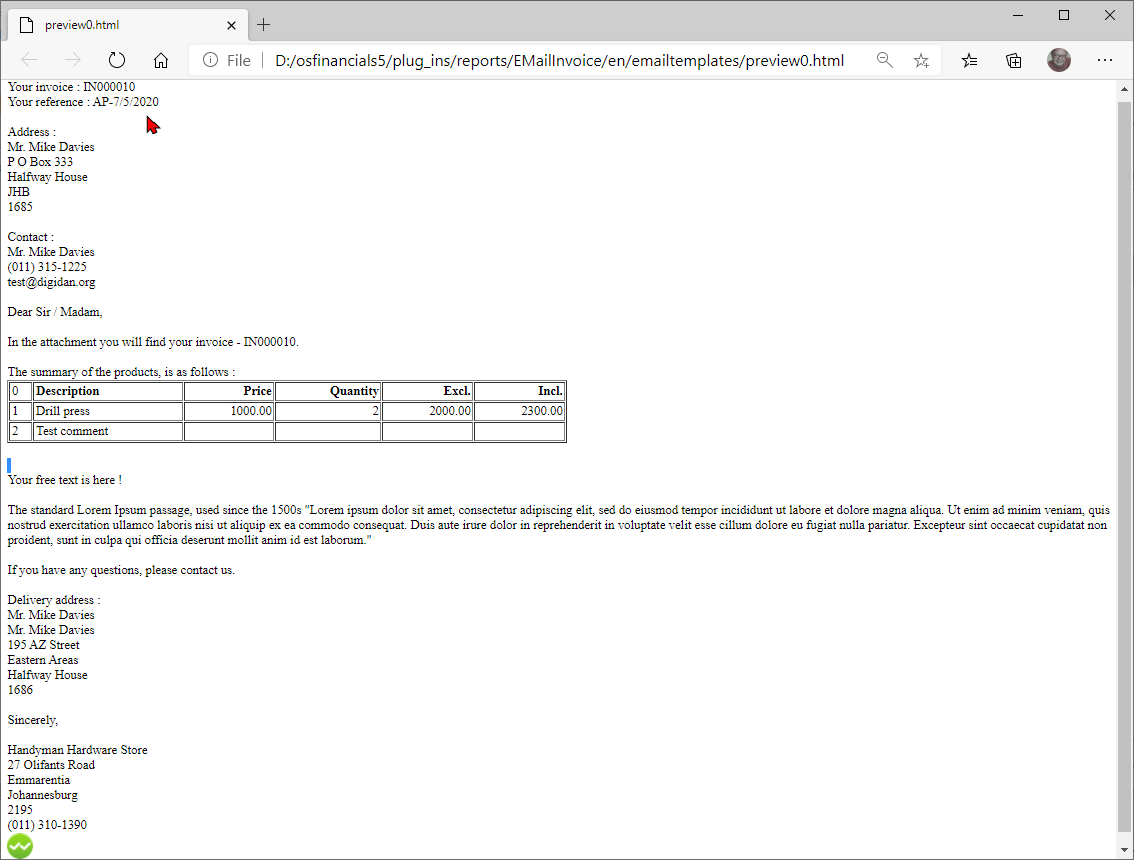
Preview of Invoice template (HTML version)
To pre-check your mail message, click on the Preview in browser button.

This will open a preview of your template in your system’s default web browser. The preview of the “10 Invoice.html” template, is as follows:
|
|
SQL files need no translation, except for the Description, Price, Quantity, Excl. and Incl., if required. These sql files are:
|
|
Section |
Description |
Field tags <#XXXX#> (no Spaces and UPPERCASE only) |
|
Your invoice : |
The document number of the selected document (i.e. Invoice) |
< #SDOCNO# > |
|
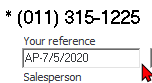
Your reference : |
|
< #SREFERENCE# > |
|
Address : |
Debtor Name, Address 1 Address 2, Address 3 and Postal code. |
Address : < #COMPANY# > < #POSTAL1# > < #POSTAL2# > < #POSTAL3# > < #POSTALCODE# > |
|
Contact : |
Contact name, telephone number. |
Contact : < #CONTACT# > < #STELEPHONE1# > |
|
E-mail address : |
The email address is by default loaded from the e-mail address in the Document entry screen:
or as over typed in the section of the “Free text” tab:
|
< #REGISTERS_EMAIL# > |
|
Summary of products: |
Description : Stock item description and comments in a separate row. Comments does not display the next 3 columns. Note : Remarks entered on the Invoice is not displayed here. |
|
|
|
Price : Unit price - Exclusive of Tax (VAT/GST/Sales tax) |
|
|
|
Quantity : Quantity or number of Stock items |
|
|
|
Excl. : Unit price X Quantity - Exclusive of Tax (VAT/GST/Sales tax) |
|
|
|
Incl. : Inclusive price X Quantity - Inclusive of Tax (VAT/GST/Sales tax) |
|
|
Free text : |
The free text entered on the Free text tab when sending e-mail. |
< #FREETEXT# > |
|
Delivery address : |
Debtor account, Contactperson, Delivery address 1, Delivery address 2, Delivery address 3 and Delivery postal code. |
Delivery address : < #DELCOMPANY# > < #DELCONTACT# > < #DELPOSTAL1# > < #DELPOSTAL2# > < #DELPOSTAL3# > < #DELPOSTALCODE# > |
|
Company details : |
Company name, Company address 1, Company address 2, Company address 3, and Postal code. (The details entered on Setup → Company info (Setup ribbon)) |
< # @LS@companyname.txt=border="0" WIDTH=300px CELLPADDING=0 CELLSPACING=0 # > <@LS@ # > |
|
Company logo : |
The image loaded on the Options tab of Setup → Company info (Setup ribbon) |
< # @LS@logo.txt=border="0" WIDTH=300px CELLPADDING=0 CELLSPACING=0 # > < @LS@ # > |

Invoice template (HTML version)
|
<body> Your invoice : <#SDOCNO#> <br/> Your reference: <#SREFERENCE#><br/> <br/> Address :</br> <#COMPANY#><br/> <#POSTAL1#><br/> <#POSTAL2#><br/> <#POSTAL3#><br/> <#POSTALCODE#><br/></br> Contact :<br/> <#CONTACT#><br/> <#STELEPHONE1#><br/> <#REGISTERS_EMAIL#><br/> <br/> Dear Sir / Madam,<br/> <br/> In the attachment you will find your invoice - <#SDOCNO#>.<br/> <br/> The summary of the products, is as follows : <br/> <#@LS@doclines.txt=border="1" WIDTH=700px CELLPADDING=2 CELLSPACING=2#> <@LS@#> <br/> <br/> <#FREETEXT#><br/> <br/> If you have any questions, please contact us.<br/> <br/> Delivery address :<br/> <#DELCOMPANY#><br/> <#DELCONTACT#><br/> <#DELPOSTAL1#><br/> <#DELPOSTAL2#><br/> <#DELPOSTAL3#><br/> <#DELPOSTALCODE#><br/> <br/> Sincerely,<br/> <br/> <#@LS@companyname.txt=border="0" WIDTH=300px CELLPADDING=0 CELLSPACING=0#> <@LS@#> <#@LS@logo.txt=border="0" WIDTH=300px CELLPADDING=0 CELLSPACING=0#> <@LS@#> </body> |
Invoice template (Text version)
The plain text version does not contain any html commands or tags.
|
Your invoice : <#SDOCNO#> Your reference : <#SREFERENCE#> Address : <#COMPANY#> <#POSTAL1#> <#POSTAL2#> <#POSTAL3#> <#POSTALCODE#> Contact : <#CONTACT#> <#STELEPHONE1#> <#REGISTERS_EMAIL#> Dear Sir / Madam, In the attachment you will find your invoice - <#SDOCNO#>. The summary of the products, is as follows : <#@LS@doclines.txt=border="1" WIDTH=700px CELLPADDING=2 CELLSPACING=2#> <@LS@#> <#FREETEXT#> If you have any questions, please contact us. Delivery address : <#DELCOMPANY#> <#DELCONTACT#> <#DELPOSTAL1#> <#DELPOSTAL2#> <#DELPOSTAL3#> <#DELPOSTALCODE#> Sincerly, <#@LS@companyname.txt=border="0" WIDTH=300px CELLPADDING=0 CELLSPACING=0#> <@LS@#> |
|
|
Note the plain text version does not contain the logo: < #@LS@logo.txt=border="0" WIDTH=300px CELLPADDING=0 CELLSPACING=0# > < @LS@# > |
The INI Template
The “10 Invoice.ini”, is as follows:
The settings entered in the .ini file will have a priority over the setting you entered the Settings tab in the plugin itself.
The standard template .ini files contains the following lines:
|
EPopUsername= |
|
|
|
EPopPassword= |
|
|
|
EPopMailserver= |
|
|
|
Esmtport= |
|
|
|
ESMTPServer= |
|
|
|
EReturnAdres= |
|
|
|
EReturnName= |
|
|
|
ECC= |
|
|
|
EBcc= |
|
|
|
EHeaderText=Invoice <#SDOCNO#> from <#FROMCOMPANYNAME#> |
|
|
These .ini files contain the following lines:
|
EPopUsername= |
The username you use to sign up for your (incoming) email |
|
EPopPassword= |
The associated password |
|
EPopMailserver= |
The mail server from where you receive the email |
|
Esmtport= |
25 (only adjust if your provider uses something else) |
|
ESMTPUsername= |
The SMTP username (outgoing email) |
|
ESMTPPassword= |
The associated password |
|
ESMTPServer= |
smtp.uwprovider.nl |
|
EReturnAdres= |
youremailaddress@yourdomainname.com |
|
EReturnName= |
Your name |
|
ECertPassword= |
The password for your certificate with which you can certify the PDF |
|
ESignCertificate= |
The location of the certificate |
|
ECC= |
Your email address if you want to receive a copy of the email yourself and the customer is allowed to see it. |
|
EBcc= |
Your email address if you want to receive a copy of the email yourself and the customer is not allowed to see it. |
|
cbPRiority= |
2 (specifies the priority of the email 2 = default) cbRecieptActnow = 0 (A 1 indicates that you want to receive a read receipt, if the recipient allows it) |
|
EHeaderText= |
Invoice <#SDOCNO#> from <#FROMCOMPANYNAME#> |
Again, not all fields need to be filled.
The fields with a value are the minimum settings.
You may need to enter more as provided by your service provider.
Customizing layouts and templates
You can create the email templates yourself, so you decide what to send. The number of email templates that can be created is unlimited and the e-mail data can be set separately for each e-mail template.
This is, for example, useful when you use multiple email addresses or want to add multiple return email addresses.
It is even possible to send multiple documents at the same time. The same document layout form (invoice / quote, etc.) must be used and email template apply.
Layout files (documents)
Document layout or quote / invoice / credit note / order / purchase / supplier return, etc.)
Layout files are stored in the " … \ plug_ins \ reports \DOCUMENTS \ DOCUMENTS \ " folder.
Selecting layout files
Select the document layout file from the list.
Customizing your own layout files
To customize document layouts for your specific requirements, you need to be able to use the Report designer.
To launch the Report designer:
On the Setup ribbon, select Report designer.
It is possible to have reports made by us.
Layout files are stored in the … \ plug_ins \ reports \ DOCUMENTS \ DOCUMENTS folder.
Customizing templates (e-mail message)
The templates are written in HTML.
If you want to change these, click the "Edit" button in the send e-mail screen. It is possible to have layouts made by us.
To open the template folder:
On the “Free text” tab, click the "Edit" button.
The folder for the files entered in the Setup E-Mail Pro screen (Plugins → Email Pro on the Setup ribbon) will be opened.
Three (3) files for each document type is included in the folder for each document type:
Your personal templates folder
Standard files are included. These are in the location: " ... \ plug_ins \ reports \ EMailInvoice \ emailtemplates \ "
For example, you can turn this into “ ... \ plug_ins \ reports \ Personal \ EMailInvoice \ emailtemplates \ “, but the word Personal can of course be something else.
This prevents you from accidentally overwriting your files during updates.
Reference – SQL English templates
In the folder " ... \ plug_ins \ reports \ EMailInvoice \ sql \ " you will find the corresponding SQL files with which you can retrieve more or different information from the database to use in your e-mails.
The sql file set consists of four (4) sql files in both, the plain text and the HTM version which includes Hypertext markup language commands and tags.
SQL file – email.txt
If you click on the show current sql button of the Settings tab on the E-mail Pro screen, the SQL – email.txt sql file will be listed. 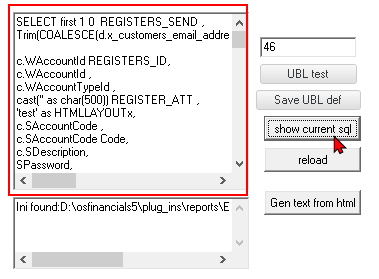
The document id for the selected document will also be displayed (e.g. 46).
|
SELECT first 1 0 REGISTERS_SEND , Trim(COALESCE(d.x_customers_email_address,b.sEmail) ) REGISTERS_EMAIL,
c.WAccountId REGISTERS_ID, c.WAccountId , c.WAccountTypeId , cast('' as char(500)) REGISTER_ATT , 'test' as HTMLLAYOUTx, c.SAccountCode , c.SAccountCode Code, c.SDescription, SPassword, STelephone1, STelephone2, SFax, SEmail, SBranchCode, SBankAccountNumber, SBankAccountName, WDueDays, d.SDOCNO, cast(d.ddate as date) ddate, d.DDUEDATE, d.WTypeid, d.SEXTERNALID, d.Sreference, d.Wdocid, sysvars.SCOMPANYNAME as FROMCOMPANYNAME, d.Wdocid TCVAR_DOCID, cast(cast(d.FDOCAMOUNT as numeric (12,2))as varchar(16)) DOCTOTAL, cast(cast(d.FTAXAMOUNT as numeric (12,2))as varchar(16)) DOCTAX, SUBSTRING(cast(cast(d.FDOCAMOUNT as numeric (12,2))as varchar(16)) from 1 for CHAR_LENGTH(cast(cast(d.FDOCAMOUNT as numeric (12,2))as varchar(16)))-3) || ','|| SUBSTRING(cast(cast(d.FDOCAMOUNT as numeric (12,2))as varchar(16)) from CHAR_LENGTH(cast(cast(d.FDOCAMOUNT as numeric (12,2))as varchar(16)))-1 for 2) DOCTOTDUTCH , poscon.SDescription Contact, poscomp.SDescription Company, delcon.SDescription delContact, delcomp.SDescription DelCompany , DelPostid1.SDescription as DelPostal1, DelPostid2.SDescription as DelPostal2, DelPostid3.SDescription as DelPostal3, DelPostCode.SDescription as DelPostalCode, Postid1.SDescription as Postal1, Postid2.SDescription as Postal2, Postid3.SDescription as Postal3, PostCode.SDescription as PostalCode
,IIF(DC.COUNTRIES_ISO_CODE_2='DE', '?d=DE/#!/' ,IIF(DC.COUNTRIES_ISO_CODE_2='BE','?d=BE/#!/','#!/')) HTMLPJVURL from debtor b
join Account c on b.WAccountId = c.WAccountId join dochead d on b.WAccountId = d.WAccountId left join messages poscon on (d.WPOSTALCONTACT = poscon.WMessageId) left join messages poscomp on (d.WPOSTALNAME = poscomp.WMessageId) left join Messages Postid1 on (d.WPostal1ID = Postid1.WMessageID) left join Messages Postid2 on (d.WPostal2ID = Postid2.WMessageID) left join Messages Postid3 on (d.WPostal3ID = Postid3.WMessageID) left join Messages Postcode on (d.WPostalCodeID = Postcode.WMessageID) left join messages delcon on (d.WDELCONTACT = delcon.WMessageId) left join messages delcomp on (d.WDELNAME = delcomp.WMessageId) left join Messages DelPostid1 on (d.WDelAddress1ID = DelPostid1.WMessageID) left join Messages DelPostid2 on (d.WDelAddress2ID = DelPostid2.WMessageID) left join Messages DelPostid3 on (d.WDelAddress3ID = DelPostid3.WMessageID) left join Messages DelPostcode on (d.WDelCodeID = DelPostcode.WMessageID)
left join countries dc on d.WDELCOUNTRIES_ID = dc.COUNTRIES_ID, sysvars where d.WDocid = <@WDOCID@> union SELECT first 1 0 REGISTERS_SEND , Trim(COALESCE(d.x_customers_email_address,b.sEmail) ) REGISTERS_EMAIL,
c.WAccountId REGISTERS_ID, c.WAccountId , c.WAccountTypeId , cast('' as char(500)) REGISTER_ATT , 'test' as HTMLLAYOUTx, c.SAccountCode , c.SAccountCode Code, c.SDescription, SPassword,
STelephone1, STelephone2, SFax, SEmail, SBranchCode, SBankAccountNumber, SBankAccountName, WDueDays, d.SDOCNO, cast(d.ddate as date) ddate , d.DDUEDATE, d.WTypeid, d.SEXTERNALID, d.Sreference, d.Wdocid, sysvars.SCOMPANYNAME as FROMCOMPANYNAME, d.Wdocid TCVAR_DOCID, cast(cast(d.FDOCAMOUNT as numeric (12,2))as varchar(16)) DOCTOTAL, cast(cast(d.FDOCAMOUNT as numeric (12,2))as varchar(16)) DOCTAX, SUBSTRING(cast(cast(d.FDOCAMOUNT as numeric (12,2))as varchar(16)) from 1 for CHAR_LENGTH(cast(cast(d.FDOCAMOUNT as numeric (12,2))as varchar(16)))-3) || ','|| SUBSTRING(cast(cast(d.FDOCAMOUNT as numeric (12,2))as varchar(16)) from CHAR_LENGTH(cast(cast(d.FDOCAMOUNT as numeric (12,2))as varchar(16)))-1 for 2) DOCTOTDUTCH , poscon.SDescription Contact, poscomp.SDescription Company, delcon.SDescription delContact, delcomp.SDescription DelCompany , DelPostid1.SDescription as DelPostal1, DelPostid2.SDescription as DelPostal2, DelPostid3.SDescription as DelPostal3, DelPostCode.SDescription as DelPostalCode, Postid1.SDescription as Postal1, Postid2.SDescription as Postal2, Postid3.SDescription as Postal3, PostCode.SDescription as PostalCode
,IIF(DC.COUNTRIES_ISO_CODE_2='DE', '?d=DE/#!/' ,IIF(DC.COUNTRIES_ISO_CODE_2='BE','?d=BE/#!/','#!/')) HTMLPJVURL from creditor b
join Account c on b.WAccountId = c.WAccountId join dochead d on b.WAccountId = d.WAccountId left join messages poscon on (d.WPOSTALCONTACT = poscon.WMessageId) left join messages poscomp on (d.WPOSTALNAME = poscomp.WMessageId) left join Messages Postid1 on (d.WPostal1ID = Postid1.WMessageID) left join Messages Postid2 on (d.WPostal2ID = Postid2.WMessageID) left join Messages Postid3 on (d.WPostal3ID = Postid3.WMessageID) left join Messages Postcode on (d.WPostalCodeID = Postcode.WMessageID) left join messages delcon on (d.WDELCONTACT = delcon.WMessageId) left join messages delcomp on (d.WDELNAME = delcomp.WMessageId) left join Messages DelPostid1 on (d.WDelAddress1ID = DelPostid1.WMessageID) left join Messages DelPostid2 on (d.WDelAddress2ID = DelPostid2.WMessageID) left join Messages DelPostid3 on (d.WDelAddress3ID = DelPostid3.WMessageID) left join Messages DelPostcode on (d.WDelCodeID = DelPostcode.WMessageID)
left join countries dc on d.WDELCOUNTRIES_ID = dc.COUNTRIES_ID, sysvars where d.WDocid = <@WDOCID@> |
SQL file – ExtraFiles.txt
Allows to select an extra attachment file to be included in the mail message of the recipient.
|
select 'XXXc:\test.txt' AFILE from rdb$database |
SQL file – selectLayout.txt
The selectLayout.txt will list all valid document layout report (*.rep) files in the … plugins \ reports \ DOCUMENTS \ DOCUMENTS \ folder where all layout files are stored.
It lists the document types and also contains the settings for the default layout file 1, layout file 2 and layout file 3 for debtor and creditor accounts.
|
select '\DOCUMENTS\DOCUMENTS\' ||soptionValue , 2 a from opreport where stroption = 'SDocLayoutNameCreditNote'and :WTYPEID=11 union select '\DOCUMENTS\DOCUMENTS\' ||soptionValue , 2 a from opreport where stroption = 'SDocLayoutNameGret'and :WTYPEID=13 union select '\DOCUMENTS\DOCUMENTS\' ||soptionValue , 2 a from opreport where stroption = 'SDocLayoutNameQuote'and :WTYPEID=14 union select '\DOCUMENTS\DOCUMENTS\' ||soptionValue , 2 a from opreport where stroption = 'SDocLayoutNameOrder'and :WTYPEID=15 union select '\DOCUMENTS\DOCUMENTS\' ||soptionValue , 2 a from opreport where stroption = 'SDocLayoutNameInv'and :WTYPEID=10 union select '\DOCUMENTS\DOCUMENTS\' ||soptionValue , 2 a from opreport where stroption = 'SDocLayoutNamePurchases'and :WTYPEID=12 union select '\DOCUMENTS\DOCUMENTS\' || SLAYOUTINVOICE , 1 from debtor where waccountid = :WACCOUNTID and SLAYOUTINVOICE <> '' and :WTYPEID=10 union select '\DOCUMENTS\DOCUMENTS\' || SLAYOUTINVOICE , 1 from creditor where waccountid = :WACCOUNTID and SLAYOUTINVOICE <> '' and :WTYPEID=12 union select '\DOCUMENTS\DOCUMENTS\' || SLAYOUTCREDITNOTE , 1 from debtor where waccountid = :WACCOUNTID and SLAYOUTCREDITNOTE <> '' and :WTYPEID=11 union select '\DOCUMENTS\DOCUMENTS\' || SLAYOUTCREDITNOTE , 1 from creditor where waccountid = :WACCOUNTID and SLAYOUTCREDITNOTE <> '' and :WTYPEID=13 union select '\DOCUMENTS\DOCUMENTS\' || SLAYOUTQUOTE , 1 from debtor where waccountid = :WACCOUNTID and SLAYOUTQUOTE <> '' and :WTYPEID=14 union select '\DOCUMENTS\DOCUMENTS\' || SLAYOUTQUOTE , 1 from creditor where waccountid = :WACCOUNTID and SLAYOUTQUOTE <> '' and :WTYPEID=15 order by 2 |
SQL file – Upd.txt
When a document is not printed, the value is “0”. Once a document is printed, the value is set to “1” and each time after a document is printed, the value is incremented.
The upd.sql set a document as printed and increment the value for each time a pdf file is generated in the Document E-mail Pro plugin.
|
Update dochead set bprinted = bprinted + 1 where Wdocid = :wdocid |
SQL file – logo.txt
This will load the image as loaded on the Options tab of Setup → Company info (Setup ribbon).
|
Select bloblogo as IMG FROM SYSVARS |
SQL file – companyname.txt
This will load the Company name and 3 address lines well as the postal code entered on Setup → Company info (Setup ribbon).
|
companyname.txt (plain text) |
HTMcompanyname.txt (html version) |
|
Select SCompanyName || ascii_char(13) || ascii_char(10) || sysvars.SADDRESS1 || ascii_char(13) || ascii_char(10) || sysvars.SADDRESS2 || sysvars.SADDRESS3 || sysvars.SPOSTCODE || ascii_char(13) || ascii_char(10) || sysvars.SPHONENUMBER from sysvars |
Select SCompanyName || '<br/>' || sysvars.SADDRESS1 || '<br/>' || sysvars.SADDRESS2 || '<br/>' || sysvars.SADDRESS3 || '<br/>' || sysvars.SPOSTCODE || '<br/>' || sysvars.SPHONENUMBER || '<br/>' from sysvars |
SQL file – doclines.txt
The highlighted text in these sql files are the only text in these two (2) sql files that may need translation for your templates.
|
doclines.txt (plain text) |
HTMdoclines.txt (html version) |
|
select 0 id, 'Description','Price','Quantity','Excl.','Incl.' from RDB$DATABASE union Select a.WSortno, m.Sdescription || COALESCE(m.SEXTRADESCRIPTION,'') Description , IIF(a.WLINETYPEID = 91,'',cast(cast(a.FSELLINGPRICE as numeric (12,2))as varchar(16))) Sellingprice , IIF(a.WLINETYPEID = 91,'',cast(cast(a.FQTYSHIPPED as numeric (12,0))as varchar(16))) Shipped , IIF(a.WLINETYPEID = 91,'',cast(cast(a.FEXCLUSIVEAMT as numeric (12,2))as varchar(16))) Exclamount, IIF(a.WLINETYPEID = 91,'',cast(cast(a.FINCLUSIVEAMT as numeric (12,2))as varchar(16))) IncAmount from docline a left join stock b on a.WStockid = b.WStockid join Messages m on a.WDESCRIPTIONID = m.WMessageID where a.Wdocid = :wdocid order by 1 |
select 0 id, '<B>Description</B>','<P ALIGN=RIGHT><B>Price</B></P>','<P ALIGN=RIGHT><B>Quantity</B></P>','<P ALIGN=RIGHT><B>Excl.</B></P>','<P ALIGN=RIGHT><B>Incl.</B></P>' from RDB$DATABASE union Select a.WSortno,m.Sdescription || COALESCE(m.SEXTRADESCRIPTION,'') Description , '<P ALIGN=RIGHT>' || IIF(a.WLINETYPEID = 91,'',cast(cast(a.FSELLINGPRICE as numeric (12,2))as varchar(16))) || '</P>' Sellingprice , '<P ALIGN=RIGHT>' || IIF(a.WLINETYPEID = 91,'',cast(cast(a.FQTYSHIPPED as numeric (12,0))as varchar(16))) || '</P>' Shipped , '<P ALIGN=RIGHT>' || IIF(a.WLINETYPEID = 91,'',cast(cast(a.FEXCLUSIVEAMT as numeric (12,2))as varchar(16))) || '</P>'Exclamount, '<P ALIGN=RIGHT>' ||IIF(a.WLINETYPEID = 91,'',cast(cast(a.FINCLUSIVEAMT as numeric (12,2))as varchar(16))) || '</P>'IncAmount from docline a left join stock b on a.WStockid = b.WStockid join Messages m on a.WDESCRIPTIONID = m.WMessageID where a.Wdocid = :wdocid order by 1 |