")
")

Introduction to the Multi-Language Plugin
The new multi-language ledgers, groups, types and batches is probably best
feature implemented in TurboCASH4 (Build 760) and in TurboCASH5.
Order the plugin here.
This makes it possible for an international company to work in different languages on the same set of books.
This helps to show local investors in their language the balances and turnover of the company.
The multi-language feature allows different users to use the
same set of books in the user language interface.
The translation of ledger accounts need to be purchased from the shop.
By default, each Set of Books will run in the selected language when launching TurboCASH for the first time (new installation). You may, if necessary (i.e. incorrect language is selected) or when you need to work in a different language, use the Start → Switch Language menu to change the language.
Any language may be customised / edited for your specific requirements on the Setup → Tools → Customise Language menu.
In addition to this, you may activate the Multi-Language feature (using any of the available languages in the Start → Switch Language menu) in a Set of Books to:
- Create a Multi-Language User Interface. This makes it possible for a multi-lingual company to work in different languages on the same set of books.
- Create a Multi-Language Accounts (Chart of Accounts) - This helps to show local investors in their language the balances and turnover of the company.
|
Multi-Language Accounts |
|||
|
Multi-Language Setup |
Multi-Language Financial Reports |
||
|
|
Add Multi-Language Groups |
|
Multi-Language Trial Balance |
|
|
Add Multi-Language Users |
|
Multi-Language Income Statement |
|
|
Translate Multi-Language Groups |
|
Multi-Language Balance Sheet |
|
|
Translate Multi-Language Types |
|
Multi-Language Standard Column Balances |
|
|
Translate Multi-Language Batch Types |
|
Multi-Language This Year vs Last Year |
|
|
Translate Multi-Language Stock Descriptions |
|
Multi-Language Budget vs Actual |
|
|
Translate Multi-Language Chart of Accounts |
|
Multi-Language Budget Listing |
|
Multi-Language Documents (Layout Files) |
Multi-Language Reports |
||
|
|
Layout Files |
|
Multi-Language Groups Report |
|
|
Multi-Language Layout Files |
|
Multi-Language Chart of Accounts Report |
|
|
Universal Document Layout Files |
Multi-Language General Ledger Export |
|
|
|
Print Documents in Debtor (Customer / Client) Language |
|
Multi-Language Column Balances |
|
|
Print Documents in Creditor (Supplier) Language |
|
Multi-Language Column Balances Debit / Credit |
|
|
|
Multi-Language Debtor (Customer / Client) Export |
|
|
|
|
|
Multi-Language Column Balances - Debtor |
|
|
|
|
Multi-Language Column Balances - Debtor Debit / Credit |
|
|
|
Multi-Language Creditor (Supplier) Export |
|
|
|
|
|
Multi-Language Column Balances - Creditor |
|
|
|
|
Multi-Language Column Balances - Creditor Debit / Credit |
License
Shop - here
License: One time fee
Add / Activate Multi-Language Feature
By creating / adding languages, languages may be translated on various screens.
To Add / Activate Multi-Language Feature:
- Go to Setup → Groups.
- Click on the Languages tab.
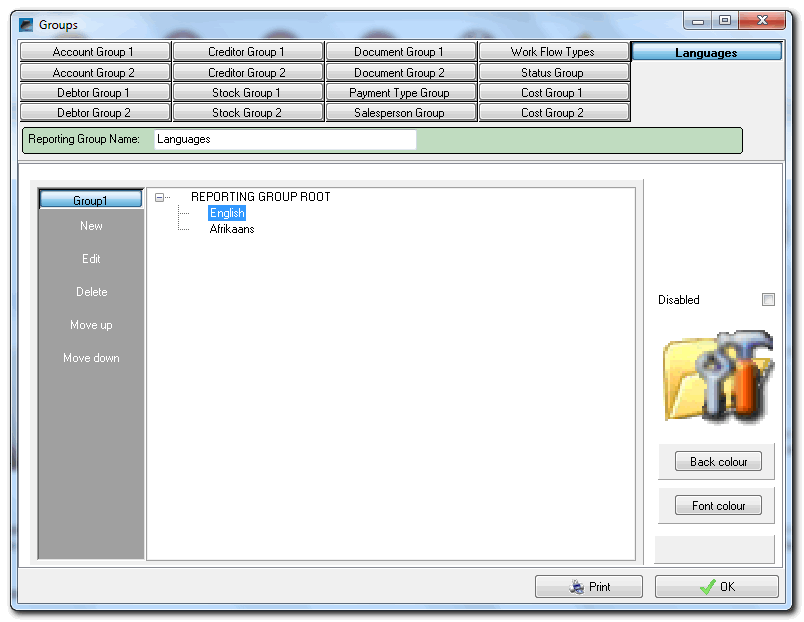
- Click on the REPORTING GROUP ROOT and click on the New button.
- Enter the Name and Description for the Language (e.g. English, Afrikaans, etc.).
- Repeat the process to add all required languages.
- Select the Language and right-click and select the Languages on the context menu.
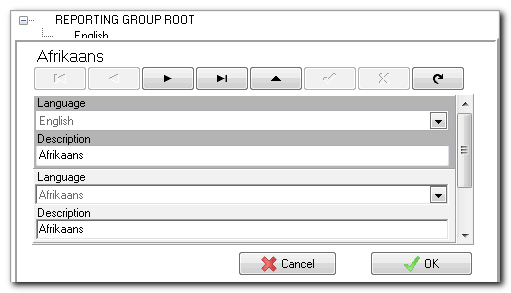
- Enter the Name and Description for each language.
- Click on the OK button.
- Repeat the process for all Languages.
- Click on the OK button of the Groups screen.
Add Multi-Language Users
By adding users and selecting different system language, and User language for each user, you may login to different languages.
To Add Multi-Language Users:
- Go to Setup → Access Control menu.
- Click on the Add button and rename the User.
- Enter a Password for the User.
- Click on the Others tab in TurboCASH (up to build 600) After build 763 you need to click on the Standard Security tab.
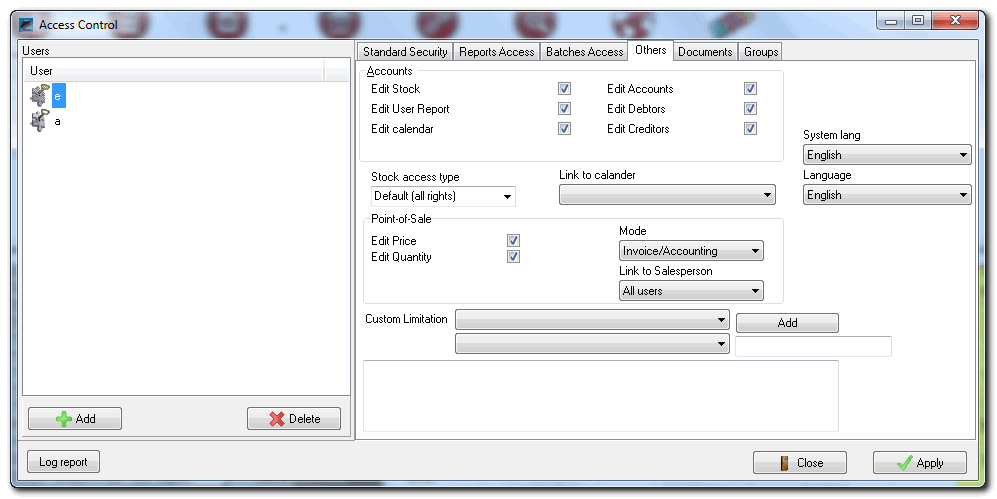
- Select the System Language.
- Select the User Language.
- Click on the Apply button.
- Click on the Add button to add the next User and rename the User.
- Enter a Password for the User.
- Click on the Others tab in TurboCASH (up to build 600) After build 763 you need to click on the Standard Security tab.

- Select the System Language.
- Select the User Language.
- Click on the Apply button.
- Click on the Close button.
| System Language will list all the available languages in the Start → Switch Language menu. Any language may be customised / edited for your specific requirements on the Setup → Tools → Customise Language menu. |
| Language will list all languages created / added in the Setup → Groups menu - Languages tab. |
Add Multi-Language Groups
The names or descriptions for Groups, as entered / edited in the Setup → Groups menu for all the Groups tabs, are by default displayed on screens, lookups, documents, reports, etc.
|
|
To use multi-language Groups, Language Groups need to be created / added in the Setup → Groups menu - Languages tab. |
The following Groups need to be translated, where necessary:
- Account Group 1
- Account Group 2
- Debtor Group 1
- Debtor Group 2
- Creditor Group 1
- Creditor Group 2
- Stock Group 1
- Stock Group 2
- Document Group 1
- Document Group 2
- Payment Types Group
- Salesperson Group
- Status Group (Used for Projects)
- Cost Group 1 (Used for Cost Centres)
- Cost Group 2 (Used for Cost Centres)
To Add Multi-Language Groups:
- Go to Setup → Groups menu.
- Click on the Account Group 1 tab.
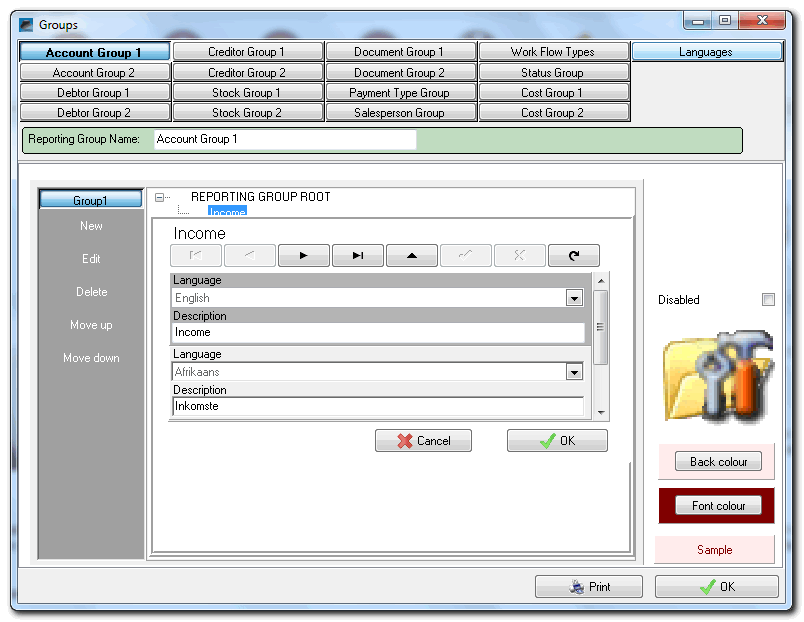
- Select a Group (e.g. Income, etc.) on the list and right-click to select the Languages on the context menu.
- Enter the Name and Description for the Accounting Group 1 item.
- Click on the OK button.
- Repeat the process to add all required items on Account Group 1.
- Repeat the process for all other Groups (e.g. Account Group 2, etc.) where required.
- Click on the OK button of the Groups screen.
Add Translations to Types
The names or descriptions for Types, as entered / edited in the Setup → Tools → Customise Language menu Types tab, are by default displayed on screens, lookups, documents, reports, etc.
|
|
To use multi-language Types, Language Groups need to be created / added in the Setup → Groups menu - Languages tab. |
1. Document Types (Action → Documents menu).
a) Invoices
b) Credit Notes
c) Quotes
d) Purchases
e) Supplier Returns
f) Orders
|
|
If you need to print the Universal Document layout files (One (1) Layout file for all document types), it is recommended that these Document Type Types be edited and / or translated to the singular. The following files will print the document type in the plural (if it is not changed to the singular): ● LabelID906276 - Document layout (10 codes) ● LabelID906277 - Document layout (15 codes) ● LabelID906278 - Document layout (No codes) For example if you print an Invoice, it should display Invoice and not Invoices on the printed layout file. |
2. Account Types
a) General Ledger Accounts
b) Debtor
c) Creditor
d) Bank Accounts
e) Tax Accounts
3. Group Types
a) Account Group 1
b) Account Group 2
c) Debtor Group 1
d) Debtor Group 2
e) Creditor Group 1
f) Creditor Group 2
g) Stock Group 1
h) Stock Group 2
i) Document Group 1
j) Document Group 2
k) Payment Types Group
l) Salesperson Group
m) Status Group (Used for Projects)
n) Cost Group 1 (Used for Cost Centres)
o) Cost Group 2 (Used for Cost Centres)
p) Languages
4. Paper Types
a) Preprinted
b) Plain A4
c) Service
d) Plain Eyeline
e) Forty
f) Till Slip
5. Other / Miscellaneous
a) This Year
b) Last Year
c) Stock Item
d) Comment
e) Serial Number
f) Financial Entry
6. User Reports
|
|
Not applicable to TurboCASH5 |
a) Account
b) Blank
c) Column Line 1
d) Group1
e) Group1 Detail
f) Group2
g) Group2 Detail
h) Single Line
i) Text
j) Budget
k) Formula
7. Colours and Theme Types
|
|
It is not necessary to translate the colours, (i.e. Classic, Pastel, Keywest, NewSA and Windows Default). These are not used in TurboCASH5. |
To Add Translations to Types:
1. Go to Setup → Tools → Customise Language menu.
2. Click on the Types tab. 
3. Select the Language and enter the Name and Description for each language.
4. Repeat the process for all Types.
5. Click on the Rest tab. 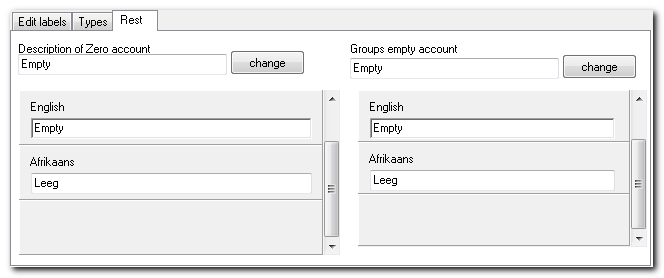
6. For the Description of Zero account, select the Language and enter the Name and Description for each language.
7. For the Groups empty description, select the Language and enter the Name and Description for each language.
8. Repeat the process for all Types.
9. Click on the Close button.
Add Translations to Batch Types
The Batch Type names or descriptions, as entered in the Setup → Batch Types menu, are by default displayed on the following options:
- Action → Batch Entry menu.
- Action → Edit → Repeating Transactions menu.
It also displays on various reports, lookup and parameter screens.
|
|
To use multi-language Batch Types, Language Groups need to be created / added in the Setup → Groups menu - Languages tab. |
To Add Translations to Batch Types:
1. Go to Setup → Batch Types menu.
2. Select the Batch Type.
3. Click on the translations button.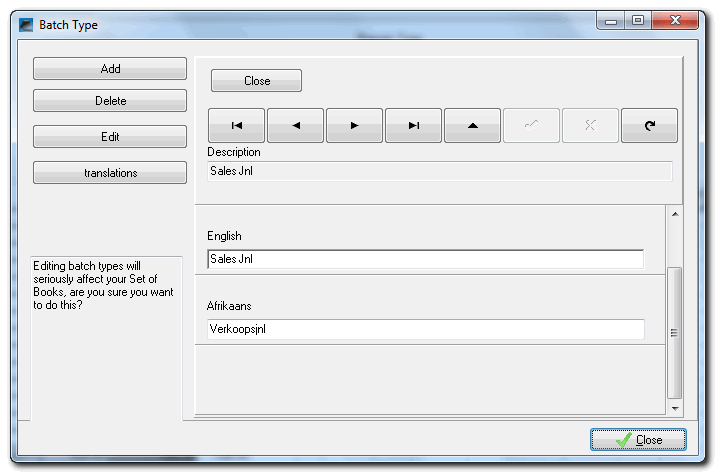
4. Select the Language and enter the Name and Description for each language.
5. Click on the Close button (on the translations screen).
6. Repeat the process for all Batch Types.
7. When the process is completed, click on the Close button on the Batch Type screen.
Add Translations to Stock Items
The Stock Item descriptions, as entered in the Description field of the Edit Stock Items screen, are by default displayed on document layout files.
|
|
To use multi-language Stock Descriptions, Language Groups need to be created / added in the Setup → Groups menu - Languages tab. |
The translated stock item descriptions should print on layout files.
To Add Translations to Stock Items:
1. Select the Stock Item from the Stock Item List screen.
2. Click on the Edit button (or double-click on the Stock Item).
3. Click on the Languages tab. 
4. Select the Language and enter the Name and Description for each language.
5. Click on the Save button.
6. Repeat the process for all Stock Items.
|
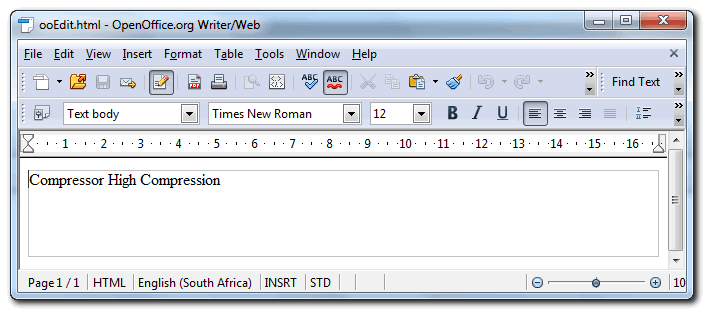
|
If you have OpenOffice installed on your system, you may double-click in the Description field of any language, to launch OpenOffice Writer/Web. Write your text and use OpenOffice to format your text, etc., if necessary. Once finished, click the OK button to transfer your text to the Description field. |
Add Translations to the Chart of Accounts
The names or descriptions for Groups, as entered / edited in the Setup → Groups menu for Account Group 1 / 2 tabs, are by default displayed on screens, lookups, documents, reports, etc.
|
|
To use multi-language Chart of Accounts, Language Groups need to be created / added in the Setup → Groups menu - Languages tab. |
To Translate the Chart of Accounts into Multi-Languages:
1. Go to Action → Accounts menu.
2. Double-click on the topbar (below the Accounts titlebar) to activate and display the Translations tab when selecting an account.
3. Select an Account (e.g. Sales, etc.) on the list and click on the Translations tab. 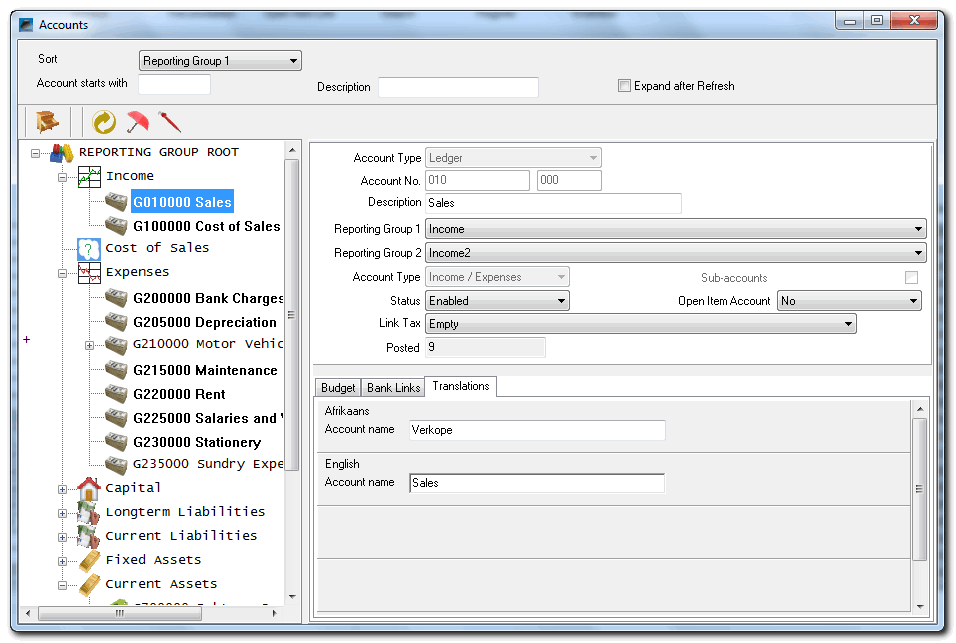
4. Enter the Account name (description) and click on the other language (e.g. English). It will activate the Save button.
5. Click on the Save button.
6. Repeat the process to translate all account descriptions.
7. Click on the Close button (on the titlebar).
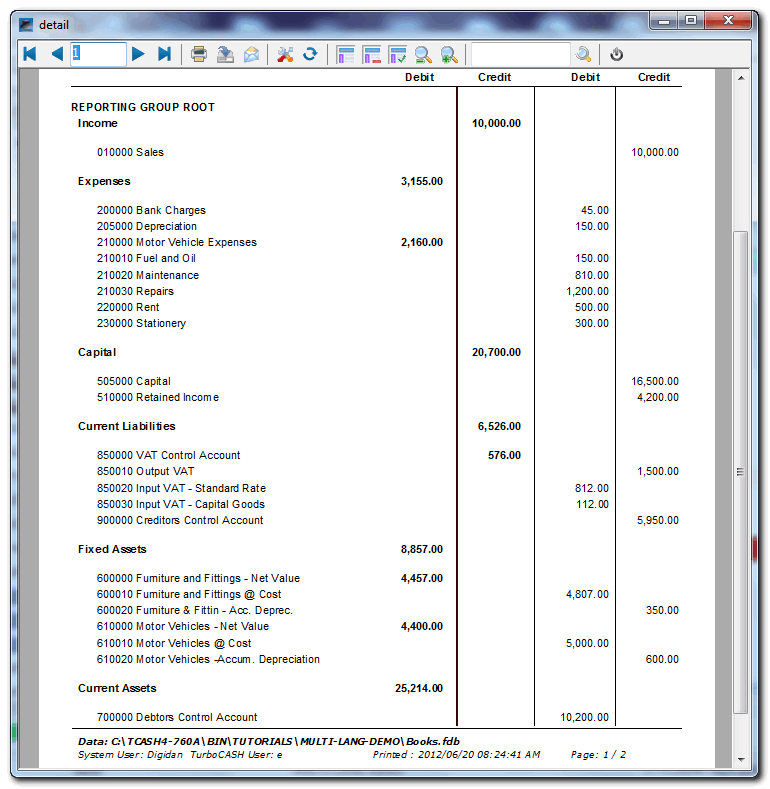
To Check the Translated Chart of Accounts into the Translated Language:
1. Click on the Open icon (Start → Open menu).
2. Select the Set of Books and click on the Open button.
3. On the Login screen, enter the username and password for the different language.
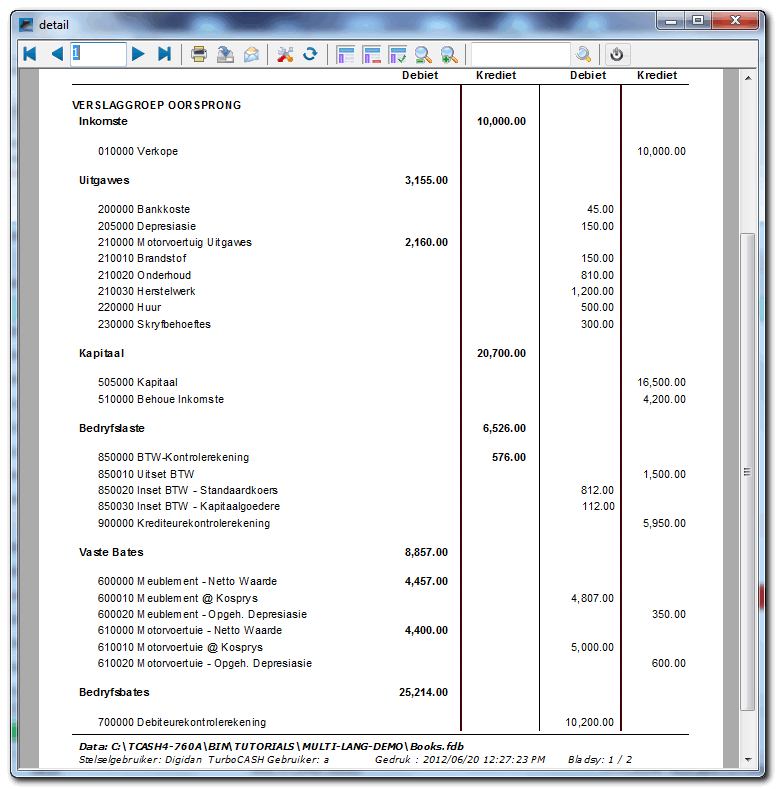
4. Click on the OK button. TurboCASH5 will open in the user's language (as per this example in Afrikaans).
5. Print the Chart of Accounts and check if it is correct.
6. Print the Account Group 1 / 2 report and check that the groups are correct.
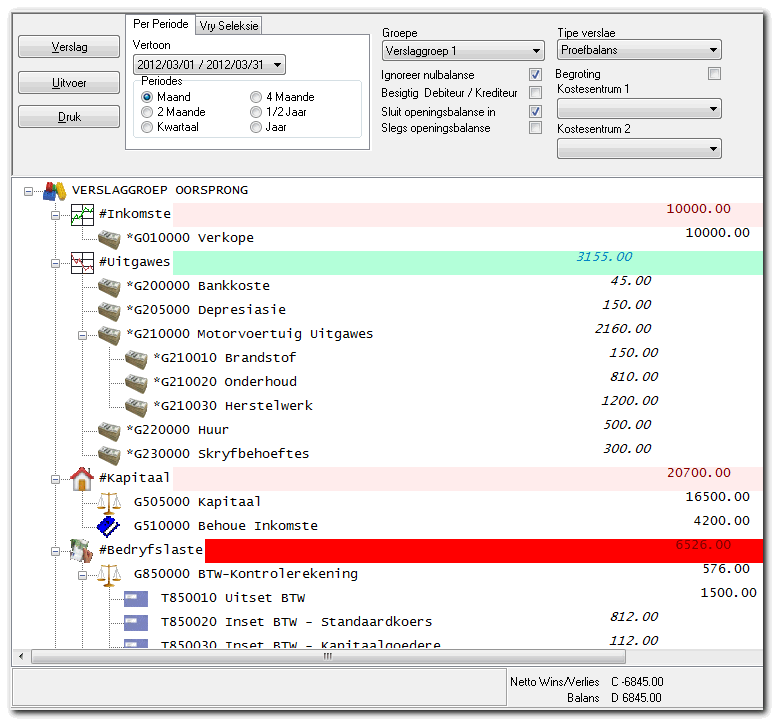
To Edit the Translated Chart of Accounts into the Translated Language:
1. Go to Action → Accounts menu.
2. Double-click on the topbar (below the Accounts titlebar) to activate and display the Translations tab when selecting an account.
3. Select an Account (e.g. Sales, etc.) on the list and click on the Translations tab. 
4. Enter the Account name (description) and click on the other language (e.g. Afrikaans). It will activate the Save button.
5. Click on the Save button.
6. Repeat the process to translate all account descriptions.
7. Click on the Close button (on the titlebar).
Multi-Language Financial Reports
Logged in as English User
Print Documents in Debtor (Customer / Client) Language
To Select / Set / Change Debtors (Customers / Clients) Preferred Language:
1. Click on the Action → Debtor menu); or press the F4 key.
2. Select the Debtor account and click on the Edit button, or double-click on a selected debtor (customer / client) account.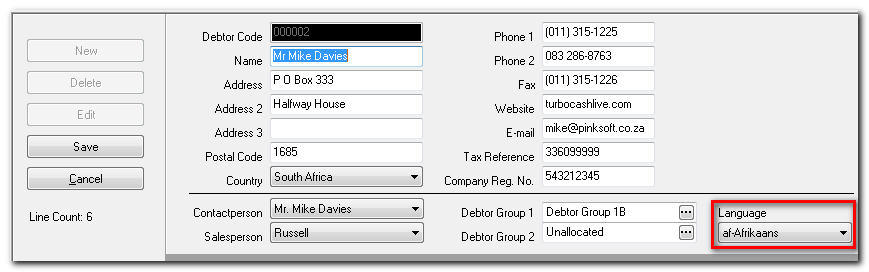
3. Select the Debtor's Language.
4. Click on the Save or OK button.
Layout Files Printed in Debtor (Customer / Client) Language:
The following layout files is printed, in the language selected on the Action → Debtor - Language field:
1. Print No Stock Codes - If you do not wish to print stock codes on documents, you may select the following layout files:
|
Debtor (Customer / Client) Layout Files - No Stock Codes |
|
|||||
|
Normal |
A4 Format |
A4 Plain Format |
||||
|
Name |
LanguageID |
Name |
LanguageID |
Name |
LanguageID |
|
|
Invoice (No code) |
TRN_906194 |
Invoice A4 (No code) |
TRN_906212 |
Invoice A4 Plain (No code) |
TRN_906230 |
|
|
Credit note (No code) |
TRN_906195 |
Credit note A4 (No code) |
TRN_906213 |
Credit note A4 Plain (No code) |
TRN_906231 |
|
|
Quote (No code) |
TRN_906196 |
Quote A4 (No code) |
TRN_906214 |
Quote A4 Plain (No code) |
TRN_906232 |
|
|
|
If you need to display your Banking details on an Invoice, you may select the Invoice Bank Details (No code) - (TRN_906192) layout file. |
|
|
If you need to print a Delivery Note, you may select the Delivery Note (No code) - (TRN-906181) layout file. |
2. Print Short Stock Codes (up to 10 Characters) - If you enter less than 10 characters in the Stock Code field and less than 25 characters in the Stock Description field, on Action → Stock Item screens, you may select the (10 code) - series of document layout files:
|
Debtor (Customer / Client) Layout Files - 10 Digit Stock Codes |
|
|||||
|
Normal |
A4 Format |
A4 Plain Format |
||||
|
Name |
LanguageID |
Name |
LanguageID |
Name |
LanguageID |
|
|
Invoice (10 code) |
TRN_906200 |
Invoice A4 (10 code) |
TRN_906218 |
Invoice A4 Plain (10 code) |
TRN_906236 |
|
|
Credit note (10 code) |
TRN_906201 |
Credit note A4 (10 code) |
TRN_906219 |
Credit note A4 Plain (10 code) |
TRN_906237 |
|
|
Quote (10 code) |
TRN_906202 |
Quote A4 (10 code) |
TRN_906220 |
Quote A4 Plain (10 code) |
TRN_906238 |
|
|
|
If you need to display your Banking details on an Invoice, you may select the Invoice Bank Details (10 code) - (TRN_906260) layout file. |
|
|
If you need to print a Delivery Note, you may select the Delivery Note (15 code) - (TRN-906182) layout file. |
3. Print Long Stock Codes (up to 15 Characters) - If you enter up to 15 characters in the Stock Code field and up to 35 characters in the Stock Description field, on Action → Stock Item screens, you may select the (15 code) - series of document layout files:
|
Debtor (Customer / Client) Layout Files - 15 Digit Stock Codes |
|
|||||
|
Normal |
A4 Format |
A4 Plain Format |
||||
|
Name |
LanguageID |
Name |
LanguageID |
Name |
LanguageID |
|
|
Invoice (15 code) |
TRN_906206 |
Invoice A4 (15 code) |
TRN_906224 |
Invoice A4 Plain (15 code) |
TRN_906242 |
|
|
Credit note (15 code) |
TRN_906207 |
Credit note A4 (15 code) |
TRN_906225 |
Credit note A4 Plain (15 code) |
TRN_906243 |
|
|
Quote (15 code) |
TRN_906208 |
Quote A4 (15 code) |
TRN_906226 |
Quote A4 Plain (15 code) |
TRN_906244 |
|
|
|
If you need to display your Banking details on an Invoice, you may select the Invoice Bank Details (15 code) - (TRN_906193) layout file. |
|
|
If you need to print a Delivery Note, you may the select Delivery Note (15 code) - (TRN-906182) layout file. |
4. Layout Files no Tax - Layout files have been designed to be displayed in the Language file (Start → Switch Language menu). If you change the language, the layout file will be displayed in the selected language (including the Tax (VAT/GST/ Sales Tax) terminology.
|
|
Should the correct tax terminology (e.g. Sales Tax, VAT, GST) not be displayed on layout files, you need to select the correct language / country file. |
|
|
We have also included a set of document layout files which does not contain the tax terminology if you are not registered as a VAT/GST/Sales Tax vendor. |
|
Debtor (Customer / Client) Layout Files - No Tax (VAT/GST/Sales Tax) |
|
|||
|
No Stock Code |
Stock Code (15 Digits) |
|||
|
Name |
LanguageID |
Name |
LanguageID |
|
|
Invoice No Tax (No code) |
TRN_906248 |
Invoice No Tax (15 code) |
TRN_906254 |
|
|
Credit note No Tax (No code) |
TRN_906249 |
Credit note No Tax (15 code) |
TRN_906255 |
|
|
Quote No Tax (No code) |
TRN_906250 |
Quote No Tax (15 code) |
TRN_906256 |
|
|
|
If you need to print a Delivery Note, you may select the Delivery Note (No code) - (TRN-906181) or Delivery Note (15 code) - (TRN-906182) layout files. |
5. Point-of-Sale (POS) Layout Files
The following Layout files are available for Point-of-Sales
- POS-STARTSP100 - (TRN_906183) - Prints on Till Slip Printers.
- POS - (TRN_906184)
- POS 2 - (TRN_906185)
- POS A4 - (TRN_906186)
Layout File 2
When printing documents, you may select Layout file 2 on the Document List screen (sidebar). When printing documents, the second layout file will be printed directly after the first layout file.
An example, is if you wish to print a Delivery Note when printing an Invoice, or when printing an Invoice with the logo and you wish to print a second copy of the Invoice or document for filing purposes.
Print Documents in Creditor (Supplier) Language
To Select / Set / Change Creditor (Supplier) Preferred Language:
1. Click on the Action → Creditor menu; or press the F5 key.
2. Select the Creditor account and click on the Edit button, or double-click on a selected creditor (supplier) account.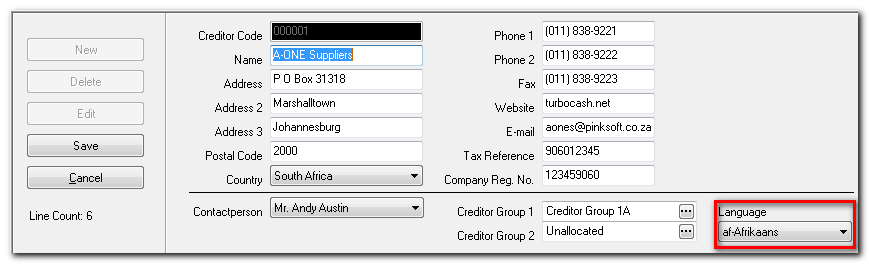
3. Select the Creditor's Language.
4. Click on the Save or OK button.
Layout Files Printed in Creditor (Supplier) Language:
The following layout files is printed, in the language selected on the Action → Creditor - Language field:
1. Print No Stock Codes - If you do not wish to print stock codes on documents, you may select the following layout files:
|
Creditor (Supplier) Layout Files - No Stock Codes |
|||||
|
Normal |
A4 Format |
A4 Plain Format |
|||
|
Name |
LanguageID |
Name |
LanguageID |
Name |
LanguageID |
|
Purchase (No code) |
TRN_906197 |
Purchase A4 (No code) |
TRN_906215 |
Purchase A4 Plain (No code) |
TRN_906233 |
|
Supplier return (No code) |
TRN_906198 |
Supplier return A4 (No code) |
TRN_906216 |
Supplier return A4 Plain (No code) |
TRN_906234 |
|
Order (No code) |
TRN_906199 |
Order A4 (No code) |
TRN_906217 |
Order A4 Plain (No code) |
TRN_906235 |
2. Print Short Stock Codes (up to 10 Characters) - If you enter less than 10 characters in the Stock Code field and less than 25 characters in the Stock Description field, on Action → Stock Item screens, you may select the (10 code) - series of document layout files:
|
Creditor (Supplier) Layout Files - 10 Digit Stock Codes |
|||||
|
Normal |
A4 Format |
A4 Plain Format |
|||
|
Name |
LanguageID |
Name |
LanguageID |
Name |
LanguageID |
|
Purchase (10 code) |
TRN_906203 |
Purchase A4 (10 code) |
TRN_906221 |
Purchase A4 Plain (10 code) |
TRN_906239 |
|
Supplier return (10 code) |
TRN_906204 |
Supplier return A4 (10 code) |
TRN_906222 |
Supplier return A4 Plain (10 code) |
TRN_906240 |
|
Order (10 code) |
TRN_906205 |
Order A4 (10 code) |
TRN_906223 |
Order A4 Plain (10 code) |
TRN_906241 |
3. Print Long Stock Codes (up to 15 Characters) - If you enter up to 15 characters in the Stock Code field and up to 35 characters in the Stock Description field, on Action → Stock Item screens, you may select the (15 code) - series of document layout files:
|
Creditor (Supplier) Layout Files - 15 Digit Stock Codes |
|||||
|
Normal |
A4 Format |
A4 Plain Format |
|||
|
Name |
LanguageID |
Name |
LanguageID |
Name |
LanguageID |
|
Purchase (15 code) |
TRN_906209 |
Purchase A4 (15 code) |
TRN_906227 |
Purchase A4 Plain (15 code) |
TRN_906245 |
|
Supplier return (15 code) |
TRN_906210 |
Supplier return A4 (15 code) |
TRN_906228 |
Supplier return A4 Plain (15 code) |
TRN_906246 |
|
Order (15 code) |
TRN_906211 |
Order A4 (15 code) |
TRN_906229 |
Order A4 Plain (15 code) |
TRN_906247 |
4. Layout Files no Tax - Layout files have been designed to be displayed in the Language file (Start → Switch Language menu). If you change the language, the layout file will be displayed in the selected language (including the Tax (VAT/GST/ Sales Tax) terminology.
|
|
Should the correct tax terminology (e.g. Sales Tax, VAT, GST) not be displayed on layout files, you need to select the correct language / country file. |
|
|
We have also included a set of document layout files which does not contain the tax terminology if you are not registered as a VAT/GST/Sales Tax vendor. |
|
Creditor (Supplier) Layout Files - No Tax (VAT/GST/Sales Tax) |
|||
|
No Stock Code |
Stock Code (15 Digits) |
||
|
Name |
LanguageID |
Name |
LanguageID |
|
Purchase No Tax (No code) |
TRN_906251 |
Purchase No Tax (15 code) |
TRN_906257 |
|
Supplier return No Tax (No code) |
TRN_906252 |
Supplier return No Tax (15 code) |
TRN_906258 |
|
Order No Tax (No code) |
TRN_906253 |
Order No Tax (15 code) |
|
Universal Layout Files
These three (3) Layout files can be used for both sales documents (i.e. Invoices, Credit Notes and Quotes) for debtors (customers / clients) as well as purchase documents (i.e. Purchases, Supplier Returns and Orders) for creditors (suppliers).
|
Universal Layout Files |
||||||
|
No Codes |
10 Codes |
15 Codes |
||||
|
Name |
LanguageID |
Name |
LanguageID |
Name |
LanguageID |
|
|
Document layout (No codes) |
TRN_906278 |
Document layout (10 codes) |
TRN_906276 |
Document layout (15 codes) |
TRN_906277 |
|
|
|
If you need to print the Universal Document layout files (One (1) Layout file for all document types), it is recommended that these Document Types are edited and / or translated to the singular on the Types tab of the Setup → Tools → Customise Language menu. These Document layout files will print the document type in the plural (if it is not changed to the singular). |
For example, if you print an Invoice, it should display Invoice and not Invoices on the printed layout file.
|
|
If you need to print the Universal Document layout files (One (1) Layout file for all document types), the Banking Details of your Company as entered in the Setup → Company Info menu will be printed on purchase documents (i.e. Purchases, Supplier Returns and Orders) for creditors (suppliers). |